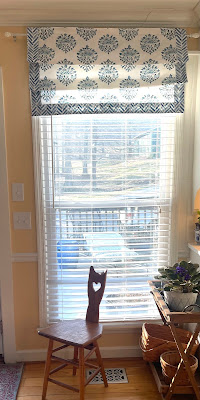
I did a little refresh on the kitchen recently. After seeing lots of block print fabrics featured in home decor, I decided to update the kitchen window treatment with a block print fabric. I shopped online and found a print I liked that I thought would cheer up the windows in the kitchen. Then, I ordered just enough to create a faux Roman shade for the two windows. I also ordered a nice print to use for trimming out the edges.
My fabric came from Spoonflower and I paid full price. I was not compensated by the company in any way. The fabric I chose is called Handblock Medallion 6 Blue on Whitney White Fabric. The contrast that I used for trim is called Indigo Blue Painted Chevron Herringbone. I ordered a length of both fabrics that was two yards in length. The fabric was 58 inches wide. I neglected to make photos along the way. So, I've created some diagrams to illustrate as best I can.
To begin, I measured the width of the window and added an inch. Then, I trimmed the selvage edge off of one side and cut the medallion fabric that width, plus one inch to allow for seam allowances. Next, I cut the fabric in half so that I had the same length for both windows. Then, I gave both pieces a quick pressing to get the wrinkles out.
I trimmed the selvage edge off one side of the herringbone fabric, measured and cut 2 pieces that were a seven inch width and the full length of the fabric. These two pieces would form the trim for the sides of the shades.
Then, I measured up seven inches and cut a strip of fabric that was the full width of the fabric. And repeated that process so that I had two seven-inch strips that were a wee bit wider than the width of the medallion pieces. These two width pieces would form the trim for the bottoms of the shades.
Now it was time to assemble the shades. I placed one of the folded strips on the left back side of the medallion piece and the other folded strip on the right with the folds toward the center of the medallion piece. The cut edges of the medallion piece and the folded pieces were flush with one another.
Then, I stitched down both sides using a half-inch seam. Next, I pressed the seam allowance toward the front of the medallion fabric. Then, pressed the herringbone fabric over to the front of the medallion fabric.
Then, I stitched along the fold of the herringbone fabric. The stitching is 1/8th of an inch from the folded edge. That encased the raw edge of the seam inside the trim.
The next step was to trim out the bottom of the shades. So, I lined up the raw edges of the widths of the herringbone fabric to the raw edge of the bottom of the in-progress shade, leaving about an inch overhang on each side. The herringbone strip is on the back side of the shade-in-progress.
At the top, I created a rod pocket by cutting a four inch strip of the herringbone fabric. I laid this strip atop the shade with right sides together and I stitched a half inch seam, making sure to have at least a one-inch overhang on each side.
Then, I folded the side edges over a half-inch and then a half-inch again and stitched that edge down to enclose the raw edges.
Next, I folded the raw edge of the rod pocket under a half-inch and pressed it. Then, I folded the rod pocket strip over to the back and pressed the seem connecting the rod pocket and the shade down to have a crisp edge with none of the herringbone fabric showing on the front.
I stitched the folded raw edge down to create the tube on the back to hold the curtain rod, stitching 1/8" from the folded edge. Then, I stitched a line across the shade from side to side one inch above that. This gave me a nice little header above the space where the curtain rod would slide through.
I decided I liked the look so much that I also wanted a faux shade above my sink. However, I didn't have a wide enough piece of the medallion print to fit the window. So, I took the piece that I had and matched the pattern to form a strip wide enough to go across the window. I finished the sides and the bottom the same way I had for the large window shades and hung it on a tension rod pushed between the cabinets.
The window treatments seemed to finish off and add a cheerful note to our updated kitchen. Even the mister commented that he really liked the new look!


No comments:
Post a Comment