If you change the way you look at things, the things you look at change.
Showing posts with label tea. Show all posts

Saturday, September 28, 2013

Aunt Mae's Dresser

Years ago, when I was a young woman and striking out on my own, my great aunt Mae gave me several wonderful pieces of furniture, linens, trunks, and treasures.  My Granny drove to Mobile, Alabama and hauled her and the gift treasures back to me - but that is a story for another day (and a fabulous one it is when you hear it rolling off Granny's lips).

Part of the furniture collection was a bed, bedside table, rocker, and dresser that was hers when she first married years, and years, and years ago.  She told me that it had a maple finish when she got it but she had paid 'good money' to have it sprayed the lovely antique green finish that I first encountered.  A lovely sight it was, I might add.  Seriously.  Furniture was not something I had in abundance and it mattered not one whit how it looked to me at the time.

Over time, however, the green-ness of it sort of got to me.  For a while the entire set was stored in the barn at one of our former houses.  We had furniture that was a more pleasing color and which worked better in the rooms we had.  Then, when the children were in high school, they needed a project for their cabinet making class.  So, this set became practice pieces for refinishing.  They did a pretty nice job considering what they had to work with - after all, this wasn't finely crafted antique furniture.  The dresser wasn't a piece that featured storage room, so it was again stored out in the barn for a time where the moisture and elements caused some cracking and releasing of glue on the laminate top.

When I moved to my previous home, it became the TV stand in the bonus room.  So, it was covered with TV and the top didn't matter.  Then, when I moved here, it became an extra piece in the junk clutter sewing/craft room.  Recently, however, we are doing some shifting and moving things around and I also had a bit of an itch to do a little painting.  I must admit that I was really inspired by Lake Girl Paints because I found a table just like the little bedside table in the downstairs bedroom and made a note to make that a future project.  Then, I got a flicker of an idea with this dresser...

Here is the BEFORE:
in all her glory...

The bones are good.  The finish is okay.  Simple and sweet.  But the top is yucky.  See...
pretty battered

You can also see that my first tool of destruction is also perched and ready for action there.  I spent a bit of time scraping and wedging the corner underneath the laminate and lifting and prying and scraping some more.  When it was all removed, the boards underneath were a bit rough but sturdy.  So, I decided to sand off the glue and rough bits and when my hands had cramped to the point of numbness and my arms were aching, the top looked like this:
lots of knot-holes and wood variation

I decided I would just give her a coat of paint.  Mike and Stephen suggested that I get some wood filler and fill the knot-holes and the biggest gouges.  So, having a coupon for a free eight-ounce tub of paint from the Spring Color Palette, off I trekked to Home Depot.  What a venture it turned out to be.

Sitting in the parking lot, I dug out my coupon and realized I needed to be at Lowe's instead!  So, off I trekked across town.  (Don't judge.  You will be old and forgetful one day, too.)  The lady at the paint counter encouraged me to select any color I desired from one particular wall.  Wow!  The choices!  The decisions!  Finally, I picked Cream in my Coffee and decided to splurge on Moose Mousse by Valspar.  While the nice lady mixed, I located the wood filler.  Then, I went in search of some furniture wax and found some good old Johnson's.  Next, I remembered that Stephen's birthday was upon me and he had mentioned wishing for an electric sander.  So, over to the tools I marched.  Of course, with a sander, one is going to need sand paper as well.  All this to say, a trip to the store for a free tub of paint and a six dollar tub of wood filler wound up totaling over seventy-five dollars.  How does that happen?

My next step with the Aunt Mae dresser was to fill the knot-holes and gouges.
Looks like a big old mess doesn't it?

After a couple of doses of putty, and plenty of time for it to dry out a bit, it was time to do a bit of smooth-off sanding.
Even after the sanding and a wipe down to remove the dust, there were some dips and uneven places.  I decided I liked the look of some rustic-ness and wanted to move on to painting.  I taped off the stained edges which still looked pretty good using some Frog Tape.  Then, the entire top got a couple of coats of the lighter color (Cream in my Coffee).  I let this dry overnight.  The next afternoon I took a deep breath and plunged into the creative aspect.  First, I found a piece of lightweight cardboard and measured off a diamond in the size I wanted - about three inches across and four inches tall.  Then, I measured the top of the dresser and marked the center point.  I centered up my cardboard diamond and traced the edges.  Then, I taped it off.  Following the line marking the center-most point, I laid my cardboard template out and marked dots to indicate where each successive diamond would go across the center and taped them off.
the first row

I carefully painted a couple of coats onto this row of diamonds.  As soon as the second coat had been applied and sort of began to set, I removed the tape.  I told myself this was a good idea because many of the blogs I'd read and pinned on Pinterest suggested this but actually, I was just too eager to see how it was beginning to look!
Dappled with afternoon sunlight makes her look so cheerful doesn't it?

I continued to add diamonds going up and down using this same process of laying out the cardboard template and making little dots.  Then, I would tape off the area stretching pieces from one corner to one dot, etc.
lining the diamonds up row-by-row

Soon it was time to start adding the connecting diamonds and adding the partial ones to the edges.
starting the connecting rows

Here is my purdy cardboard template in action preparing to line up one diamond after another.
Sort of looks like a chaotic mess, huh?

With each row, I grew more and more excited.  I liked each step progressively and would pause to ask myself if I should just leave it as it was because it looked pretty good like that!
Kind of has an argyle look going on here.

The photo above shows how I used little strips to create diamonds and connect the corners of the previously painted ones.  The process went pretty quickly and I got all of them painted between the time I came home from work and before I went to bed...and I didn't even stay up late!
Diamonds are a girl's best friend!

If you look closely, you can tell that all my diamonds are not precisely the same.  If I had it to do again On my next piece that I embellish with a diamond pattern, I will probably trace off the first diamond and use a yardstick to draw out straight, even lines from top to bottom and across from side to side.
The glow from the over-head light is almost as strong as the one on my face!

I left her to dry overnight.  Then, I dragged her back out onto the deck and gave her a little sanding with a fine-grit sanding block.  I just wanted to knock down the edges of the painted diamonds and distress the corners and edges a wee bit.  Then, I rubbed on a couple of coats of paste wax and buffed it to a soft buttery sheen before moving her into the bedroom with the bed, bedside table, and rocker.
Ready for a tea party!

A closer look at the front which required no attention...

Here is a full shot with the mirror above it.

I think Aunt Mae would be pleased.
I know I am!

Sunday, January 22, 2012

Showering with Love

The photo below expresses what each woman who attended the baby shower last week was really saying when she entered our house.
Banner on the Den Mantle

We all wanted to shower Jay and Jessica with love.  We all want to welcome their new bundles to this world and help them to guide and nurture those little cherubs toward independence and success.  We all are excited about the addition of a new baby to any family and when that is doubled, the feelings of love and excitement are also multiplied. 

Here is a walk-through of the festivities...

These guys became the welcome crew on the French doors entering the kitchen.

Again, we were so busy enjoying everybody's company that we forgot to take photos of the entry.  Cute green balloons with white polka-dots and blue balloons tied together with green or blue tulle were strung along the plank fence leading to the house.  Then, the two storks holding the cute little bundles were cut out, stapled and stuffed and hung by a cute ribbon on the back doors leading from the deck into the kitchen of our house.

My daughter, Bridgette, created those guys.  They were adorable!  I really hate we didn't get a shot of them hanging there facing one another and becoming folks in the door.  She added orange storky legs made from cardboard rolls.  At first her bubble of creative pride was feeling a little bit burst when her hubby told her that they looked like "the pickle bird."  Then, she realized that "the pickle bird" is a stork and she was gratified! 

Beautiful Mom-to-be

Our honored mom-to-be was pinned with a corsage as soon as she came into the door.  Then, we quickly slid a chair beneath her because she has been relegated to bed rest for the remainder of our wait till the babes make their appearance.

Close-up of the corsage

The cute corsage is also a practical gift.  It was fashioned of three little soft washcloths rolled and tied together with coordinating ribbons and baby pacifiers.  It's softness also coordinated the colors and polka-dots which served as the coordinating theme of the shower.

Laundry Line Mantle Decoration

In the background of this photo you can see the laundry line that was strung across the kitchen mantle which featured onesies Bridgette had appliqued with the babies' names and the cute little crocheted hats which match.

Food Table Centerpiece

We kept the decorations to a minimum and tried to make them all be a practical gift for our honored mom.  We simply set a lantern filled with baby bottles, color-coordinated coated spoons, and pacifiers all tied with coordinating ribbons on a tray with flowers which followed our color scheme - chartreuse pom mums, white Shasta daisies, and hydrangea blooms.  (We originally tried for blue hydrangea blooms and woke up the morning of our soiree to notice that they had wilted miserably.  So, Jessica stopped at the grocery store florist on her way to the party and picked up new soft white blooms.  I'll share what I learned about preventing hydrangea wilting in a later post.)

Diaper Cake Jessica created

My daughter-in-law, Jessica created this cute diaper cake to serve as a decorative centerpiece for the gift table.  You can read more about the preparations HERE in a previous post. 

We tried to keep the menu simple and requiring little last-minute preparation.  It included:
California Chicken Salad stuffed Croissants
Pretzels
Crudites and Ranch Dip
Sliced Granny Smith Apples and Caramel Dip
White Chocolate coated Oreos drizzled with green frosting
Chocolate coated Peanut butter shortbread cookies drizzled with blue frosting
Cream Cheese Squares
Chocolate-Chocolate Chip muffins
Cheese Ring and Crackers

It was light, tasty, and simple.  Plus, it looked beautiful!
Food Table

Sandwiches

White chocolate coated Oreos with green drizzle

Simple chocolate chip muffins look festive with cute little baby picks poking out the top!

Chocolate coated peanut butter shortbread cookies drizzled with blue frosting

Cream Cheese Squares (I'll post a recipe for these easy treats later!)

Bridgette was the photographer and her camera even makes the healthy snacks look delicious!

Yummy Munchies

You can find the recipe for the Cheese Ring spread HERE or contact the Nolensville Historical Society to get your own copy of the Recipes and Memories cookbook.  We used simple white Pfaltsgraff plates and a collection of white and blue cloth napkins out of my cupboard.  To wet our whistles we had ice water served in simple glass pitchers, a carafe of coffee, and a punch bowl filled with Miss Daisy's Tea Punch.  I froze slices of lime in a little bowl of punch to serve as the chiller in the punch bowl.  I have a collection of glass punch cups which came with my two inexpensive antique punch bowls and we also used the white coffee cups from my Pfaltsgraff dishes.

Our anxious mother soon set to unwrapping all the gifts.  The excitement just seemed to build with each unveiling.
Jessica reading one of the cards as her sister-in-law, Julie, keeps a list of the gifts
to aide in Thank-You Note writing later.

Most gifts came like the babies, in twos!

Every little farm boy will need a cap.

Even diaper packages came in pairs!

There were so many treats that great-grandmother O had to help out at times.

Lots of gifts were personalized to aide in sorting out which baby is who later.

Lots of socializing and catching up was enjoyed by all in attendance.
Wonder if grandma 'Nan' is counting the days till she is squeezing two new little boys?

Lillie seems to be informing her great-grandma as well as the
babies' other great-grandma of something important!


One wonders how her back and legs are holding up!  Guess that is part of why she needs complete bed rest for a few more days till the due date, huh?
Till then, we all are waiting anxiously for the arrival of the two cuddly bundles - and nobody is looking forward to that more than Jessica, I'm sure!

Sunday, December 11, 2011

Christmas Tea

Last Sunday, my mother-in-law took my favorite sister-in-law, JoAnn, and me to the second annual Nolensville Methodist Church Christmas Tea.  It is a fun event where women fellowship together, enjoy a nice meal, are enlightened by a motivational Christian speaker, and really get to see a plethora of beautiful holiday tablescapes while participating in a fundraiser for the church women's ministries.

Tables are sponsored by individual women who are members of the church and they invite their friends and family to come and join them for the afternoon.  The sponsor of the table is responsible for setting and decorating her table.  Sometimes a couple or three women will go in together and purchase the tickets for guests and decorate the table.  This is what my mother-in-law and a couple of her friends did.

JoAnn and I were guests of our mother-in-law.  A high school friend to JoAnn and me, Patricia, was a guest of her mother, Joyce's, as was one of her mother's friends, Pat.  Another of my mother-in-law's friends, Betty, brought her daughter as a guest.  Plus, the three women combined forces to set and decorate the table as well.  I think one woman provided the goblets, another the plates, and yet another brought the cups and saucers.  What a team!

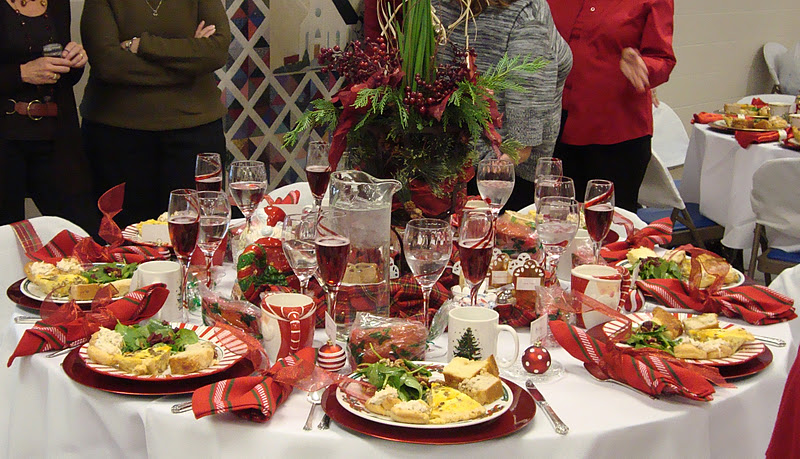
Here is a look at their table:

Isn't it beautiful?  The collection of Christmas holly, green and gold seems so elegant.

It is hard to believe that all of this didn't come from the same cupboard isn't it?  I think the three women did a beautiful job of blending their resources seamlessly.  Plus, even the food seemed to take the cue and sparkle in greens and golds!

Here is a look at the centerpiece.

It features a gold lame' platform for a beautiful little white sleigh trimmed in gold.  Each additional element seems to add a bit of glitz and glimmer which only enhances the magic of Santa and the cherub in the sleigh.

Little glittering gold Christmas trees held the place cards.

Golden, glittery reindeer danced around the sleigh.

Clear glass ornaments with white glittery trim which looks like lacy snowflakes were scattered at the base of the lame' platform.

  Delicate white glittery Christmas trees flank the sleigh adding a frosty shiver to the scenery.

Aren't the soft details of Santa, the little cherub passenger, the toys, and the sleigh a soft and subtle beauty?

Here is one last look at the over-all effect.

I snapped some shots of other tables some of the women had created.  They were all masterpieces in my eyes. 

This table is a study of frosty, silvery, simplicity.

I absolutely love these shiny, silver star ornaments tied with the red and silver ribbon!

Isn't it wonderful how the different little cards add such an individual touch to the ornaments which are simply propped against the tea cup?

It was delightful from any angle.

This one was really playful and fun!

I really like how they alternated the modern, square, red snowflake plates with the more traditional round stoneware plates.  They also alternated between white snowflake place mats and red ones.  The mugs match the plates.  Of course, being the polka-dot lover that I am, I absolutely adore the napkins.  The beaded napkin holders are beautiful and I probably would not have been risky enough to use those with these napkins and place settings. 

A closer look at the centerpiece of this fun cranberry and polka-dot table.

The fluffy cotton batting projects the image of drifts of snow.  The peppermint garland trailing round the table repeats the red-and-white theme.  Then, the glittering china gifts with their sparkling bows add just a touch of glitz.  The wrapped gift concept is repeated with the place-card holders.  The cranberry juice in the champagne goblets mirrors the huge cranberry goblet centerpiece.  Isn't there loads to love about this fun tablescape?

Another study in cranberry and white.

Here is another table which has loads to focus upon.  Again, the hostess has alternated styles of plates and mugs.  This time the edge of one plate features stripes with a Santa mug and the next is a stoneware one with a Christmas tree mug.  Crystal goblets and the cranberry chargers tie all the place settings together.  Notice how the champagne goblets holding the juice have a ribbon stripe on them, too?  The place-cards are little red glittery ornaments painted with white polka-dots or stripes.  These cute little orbs are honored to sit on a pedestal created by a little antique glass plate like the ones my grandmother collected from Quaker oats.  The red striped napkins are tied with an organza wired-edged ribbon.  This hostess, like the previous one also gifted her guests with little loaves of sweet bread in a holiday bag.  What a nice touch! 

Here is another look at this cranberry tablescape.

I think the centerpiece on it was my favorite of the day.

There were lots of naturals with the green sprucey branches, the beautiful berries, curly willow, and the paper-whites tied up with raffia.  It is just hard to beat good old mother nature.

Love this lantern!  I'm just going to have to get me one of these, I think.

This table was pure modern and minimalist.  The hostess simply wrapped the Merlot napkins with a bit of glitzy ribbon.  More of the same ribbon forms a bow with trailing tails atop the lantern.  A Merlot ribbon with a sparkly golden gemstone in the center was tied to the water goblets.  The clean-lined mugs were placed atop black saucers to coordinate with the black lantern.  Tiny gold and red sparkly glass ornaments were scattered round the lantern.  If you look really closely at the dinner plates, you can see that the word Believe is scripted across them.  Chic and lovely!

Traditional Christmas.

This table is like a little church lady sitting on the back pew to me.  It is so full of gorgeous traditional features.  It starts with the red damask table runner, place mats, and napkins.  (I had to do a double take to notice that there were only four place mats and the other two place settings were atop a table runner!  These two places have contrasting napkins as well.  It was probably done that way because the hostess had this as a set, but wouldn't that be a good way to designate guests of honor?)  Then, red chargers cradle floral Christmas china which is paired with matching tea cups and saucers.  The goblets are etched with Christmas trees.

A closer look at the beautiful centerpiece.

The huge hurricanes are filled with fresh cranberries which snuggle around the gold swirled candles.  The floral arrangement is sitting atop a glass pedestal as well.  It features red roses, golden pine cones, a few sprigs of evergreen, and a golden rope garland trailed through it.  The adorable little white metal sleigh is filled with shiny gold ornaments and a sweet little bird rides sentinel on the back.  If you look really closely, you can see that the hostess tied red fabric ribbons around the chair backs to give the simple folding chairs with white toppers a pretty Sunday dress-like sash.  I love how the light makes all of the glassware shine!

Love this simple way of dressing up the chairs!

Here is another table that features lots of things I just love!  Of course, I cannot get to the table itself without commenting on the creativity of the hostess to dress up each chair.  Yes, that is six identical table runners draped over the back of each of the chairs and tied with a pretty, sparkly organza ribbon.  How clever! 

This hostess let the flood of red color do most of the work for her!

Again, the hostess kept things simple and easy on herself.  Remember that each hostess had to load all her dishes and tablescape materials into her car and haul it to the church and unload it and dress her designated table.  There was lots of work involved, no matter how simple she kept things.  This hostess used a beautiful red damask tablecloth and napkins to set the stage.  The napkins were pleated and swirled so that no napkin ring was necessary.  Then, she centered the table with a tower of my favorite apples - Granny Smiths. 

Nature's Bountiful Beauty

I tried to look as closely as I could to see how she had created this but couldn't really tell without picking at it a little and didn't want to be rude!  It seems to start with a base of greenery such as spruce branches or yew.  Then, I think the apples were speared onto picks and stuck into a Styrofoam pyramid.  Little sprigs of baby's breath and chartreuse carnations were sprinkled in to fill spaces.  Then, more of the white, wire-edged, organza ribbon was looped around, tied up in a bow with trailing tails to top off the apple tree.  This is another one of those simple, natural, and beautiful centerpieces.

Creative mixing and matching!

This hostess did all sorts of mixing and matching to create her tablescape!  There are three different kinds of china making up each place setting, I think.  First there is the bone china cups and saucers.  Then, there is the snowflake dinner plate.  Finally, there is the Twelve-Days-Of-Christmas salad plates.  Not only did her guests have their food on these song-commemorating plates, but they also stood on plate stands to create a centerpiece!  There are at least four of them propped upon stands placed around the center glass candle stand which holds a fat red glittery candle.  More of these candles are placed between the plate stands.  The painted goblets not only hold water, but serve as tea light candle holders as well.  Simple sprigs of boxwood are placed around the center candle stand.  This hostess has chosen to use embroidered linen cocktail napkins encircled by a silver napkin ring and she has rolled up some sort of epistle in a scroll to sit beside each plate for her guests.  I like how this hostess let her dishes do all the work!

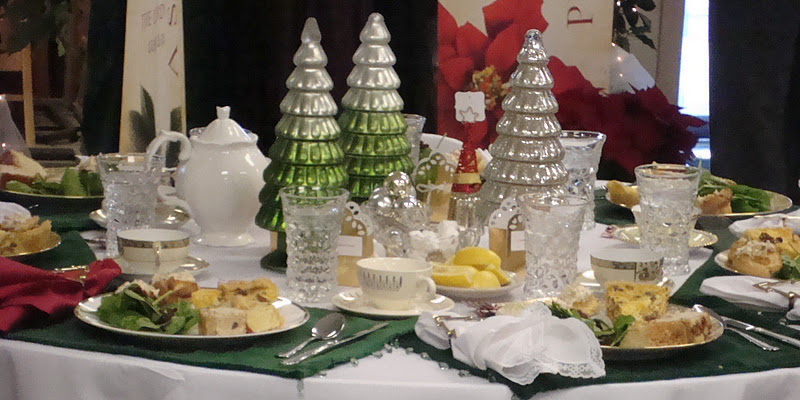
Christmas Green and Shiny Silver

This tabletop uses the sheen of the crystal and the silver mercury glass trees to dress up the dark spruce place mats.  The hostess used two different sets of antique china for her place settings.  Half of her napkins were white and lace trimmed and the other half were burgundy linen.  All the napkins had beautiful silver Christmas tree napkin rings.  she created a forest with her glass trees and had a couple of bowls of small silver ornaments placed on the table for added shine.  The place mats had little beaded edges which looked like ornaments dangling from branches of spruce.  It was truly lovely!

Casual elegance at its finest!

Mike's friend, Jackie, created this beautiful tablescape.  She put a modern turn on the traditions of her heritage.  The strong African women with carved swirls in their dresses certainly were surrounded by a group of beautiful strong African-American women on this day.  The beautiful red rose buds were accented with natural, dark twigs and more twigs which were frosted with crystals which reflected the flickering candles in the beautiful ruby red candle holders.  Little sprigs of greenery graced the golden napkin holders which were around alternating ruby floral napkins and embroidered white linen ones.  Sprigs of green holly encircled the plates (And I think they were paper - aren't they pretty?).  More holly sprigs are painted on the mugs around the words, "Remember the true meaning of Christmas."  Doesn't this say it all?

Antique and pink!

This table offers a break from the traditional red and green and lends a nod to the past.  This hostess used her antique pink floral china and dressed it for Christmas.  She used olive green chargers to hold the beautiful dinner plates.  These set atop a damask champagne tablecloth.  The beautiful matching napkins are tied up with gold organza ribbons. 

Here is a close-up of the teapot and cups.  Isn't this old china gorgeous?

The hostess made a nest with an olive feather boa.  Then, she piled shiny blown glass ornaments in the center along with satin finished ones sticking with the pink and gold color scheme of her china. 

Doesn't this look glamorous?

The menu was just as delicious as the scenery was a feast to the eyes.  We dined on quiche, fresh spinach with dried cranberries and crisp pecans for a salad, chicken salad stuffed min croissants, two different kinds of sweet breads, and frosted sugar cookies.  We had a choice of several kinds of teas as well.  The company was pleasant and the fare was delicious!  The day was truly a feast for our stomachs, our hearts, and our eyes!