If you change the way you look at things, the things you look at change.
Showing posts with label paint. Show all posts

Wednesday, July 6, 2022

Laundry/Pantry Update!

Our laundry room and pantry are actually just a hallway with closets for the washer and dryer and for food storage. There is a doorway leading out onto the back porch on one end and the other end is open toward a little space where the main bedroom and basement doors are. It is an important part of our house but the only ones who spend much time there are Toby and me. Therefore, it has been somewhat neglected the entire time I have lived in this house. Oh, I've organized the pantry and had hung some sundries on the wall but really, it was just left to be a functional space with no love...until this spring.

Way back in the summer of 2018, we splurged on a house update and had the windows replaced. We also had one of the doors replaced at that time - the one that leads out of the laundry room onto the back porch. In the process of that, a part of the floor needed replacing due to water damage where the rain and weather had leaked in from the previous door. So, we were left with a space that looked like this:

Dated linoleum with a hole cut into it and nice roughed-in plywood space for the floor. Bifold closet doors that were off-track and dragged across the floor in one spot. One might say it was a space where sadness abounds. However, Toby and I just made the best of things and went on about our business. I gave him a nice little pallet to lay on and we were careful to make certain the doors didn't fall off when washing and drying clothes. 

The washer and dryer were a bit old-school. The dryer came second-hand from a 2014 or 2016 Facebook post where Mike's nephew needed a washer for the dairy barn and we needed a dryer because our old one was going through a couple of cycles to get clothes dry. We each gave the Facebook poster a $100 bill and we had new-to-us appliances. Both the washer and dryer were noisy but serviceable. Then, last summer, the dryer started needing a bit more time on heavy loads to get things dry. So, our eldest grandson, Harris, and I pulled it out to suck lint out of the vent. In doing so, we found that the plastic pipe that led outside had begun to crumble from years of age and use. We did a really marvelous job of duct taping it to repair and hold it in place. However, over the winter, the dryer started making a high-pitched squeak and squawk and often needed a second cycle to get the clothes dry. Mike and I decided it was time to bite the bullet and get a new one. 

Ordering a new washer and dryer sounds simple until one takes a pause to consider that the vent pipe needed replacing and the floor needed replacing first. Plus, finding a handyman to take care of those jobs in this era proved difficult. We checked locally and found nobody would even respond to our call. So, we decided to call on my cousin's husband who had done some work for us during the pandemic, Richard Stanaland with The Tool Chest. He was willing to put us on his list even though the drive is almost an hour from his house. He and cousin Faye came over and gave things a good look. We agreed that adding bead board to the long wall opposite the washer/dryer closet and pantry would be a good idea and found a couple of non-working fluorescent light fixtures in the pantry and washer/dryer closet that I didn't even know were there. Richard agreed to replace them as well. He took measurements and gave me the dimensions for the amount of flooring to order. Then, about seven weeks later, he sent me a text message saying he would see us in a couple of days. 

Now, my hope was to put a tile floor down in this area because I wanted it dog and waterproof. After all, this serves as Toby's 'room' most of the time. However, that was not a possibility without some major reconstruction on the door opening because it was so near to the plywood sub-floor. We all decided that reconstruction wasn't a good option and Richard suggested we look at vinyl plank flooring to get similar protective covering. Wow! there were so many options. So, right after Richard's initial visit, I surfed the net and looked at all the options. Mike quickly told me that whatever I thought would suit him fine. So, I landed on one and ordered a sample. Within a couple of days, I ordered the amount that was suggested by Lowe's according to the measurements and it was delivered by the end of the week. So, we slid it under the bed and it lived there acclimating till our opportunity on Richard's list came up. 

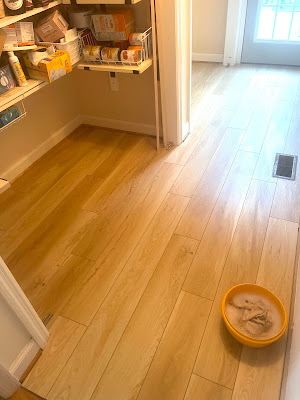
Mike called a friend who said he'd take the washer and dryer away and Stephen, Mike, and I moved them out onto the back porch. I cleaned things up a bit and removed everything that was on the floor of the pantry and the items on the wall to be ready for our handyman. Richard's first steps were to remove the baseboard and shoe molding. Then, he went straight to work cutting and laying the flooring. By day's end, the floor was installed, baseboard and shoe molding was re-installed on the closet side of the area, and things already looked lots better!
Inside the pantry

Inside the washer/dryer closet

View down the hallway while standing at the outside door

Since school was still in session, during my lunch break, I ordered the washer and dryer that I'd decided would best suit our needs and found that it would be delivered promptly within a couple of days. The late afternoon found me at the local Ace Hardware store selecting paint. I had originally thought about using a green because I was really amazed at how great this Butler's Pantry looked. However, I knew that I wanted to paint the entire long wall from baseboard to crown molding and worried that it would be a bit dark and overwhelming for such a small space. I then decided I would paint the same color as the outside of the doors on the back of the house, Wythe Blue by Benjamin Moore. However, as I stood in the paint aisle, an image on one of the inspiration pamphlets jumped out at me and I landed on Gossamer Blue by Benjamin Moore. Soon, the paint was tinted and shaken and I was on my way. 

The next day, our handyman installed the new vent piping for the dryer and the bead board along the long wall shown in the image above. Using the style with a little ledge and a couple of molding pieces that is in our guest bath, he topped off the five-foot run of bead board. Then, replaced the baseboard and shoe mold and rehung the bifold doors for the washer/dryer closet and pantry. He finished out the day by replacing the newly discovered light fixtures, swapping out the outlets and light switch plates from dated cream to modern white, swept up the dust, and was on his way. Quick work! Plus, everything looked so much better!

I got a notice that the washer and dryer would be delivered the following day. So, after I finished up work for the day, I rolled paint on the walls in the washer/dryer closet. I knew that we would not want to pull those appliances back out when the painter came and figured Toby and I would be the only ones to ever see that area. I didn't even care if the odd nail holes were patched and repaired - just wanted everything in there covered with a new coat of paint. So, by bedtime I'd slapped a couple of coats of paint on the wall.
Sad looking before of the washer/dryer closet

Brighter, cleaner looking after

Shiny new vent pipe and paint coating the walls

The young men who delivered the new washer and dryer were so patient and careful. They were patient with Mike and I chatting with them throughout the process and were patient in maneuvering the appliances into tight quarters. They were careful not to mess anything up and to be sure that the appliances were installed properly. So far the entire process was a wonderfully satisfying experience.
The new appliances in the freshly-painted washer/dryer closet

When I ordered the washer and dryer, Mike had called a local painter who had done work for us before. He said he would work us in soon since it was just a small job. So, after a couple more weeks, we got a message that he would show up the next day, bright and early in the morning. After I finished up work that day, I made a quick dash to the local Ace Hardware and they tinted a primer for the bead board for us. Then, after dinner that evening, I emptied out the pantry and gave everything a good cleaning. 

Pantry contents stashed to the side of the den

Pantry contents piled atop the dining room table

Empty but clean pantry shelves

Empty shelving in the pantry

(Richard, our handyman, had done a bit of adjustment on the pantry shelving back when he installed the front door a couple of years ago. Instead of having shelves that were two shelving boards wide, we now had brackets and the shelving wrapped around the walls. Very little storage space was lost and seeing everything on the shelves made things easier for me to keep organized. The only expense beyond paying Richard was the brackets for the old shelves that were cut to fit.)

At the end of the next day, all the walls had been painted and everything looked fresh and clean! While I had hoped to have walls, brackets, and shelving all painted, the painter told me that he thought the shelving should be painted with a trim type of paint rather than what I had purchased for the walls. So, he removed the the shelving, which would remain white and everything else got a good coat of paint.
The bead board wall, painted

The pantry, painted

A couple of days later, my daughter, Bridgette, made a visit. Since she is one who likes to use power tools (and Mike is not much of a handyman), she and her girls helped me to re-install the pantry shelving. 
Nice, clean shelving and walls

Stocked and organized

I replaced all the stuff and even ordered a couple more storage bins and turntables to keep things organized in the pantry. Now, the corners each have these Lazy Susan Turntables in the corner and ample bins to hold like items for easy organization and retrieval. 

The lights in the pantry and the washer/dryer space are so nice and brighten up even the most mundane chore and search. While the entire process took more than a couple of months, it was well worth the wait, the temporary disorder, and the expense. I love my new quiet and efficient appliances and the space is fresh and welcoming even when the chores required in that space are not thrilling or exciting. I've made a couple of tweaks that I will share in a different post but Toby and I are really happy with this little workhorse space!

Saturday, December 26, 2020

Painting Project

One of my summer projects was to paint the furniture that sits on the back porch. Even though I ordered multiple cans of paint, I still ran out before getting everything coated. So, I still had a little bit of a project to finish up this year.

One of the things that we got from the dairy barn when Mom sold the farm equipment was this table that Daddy had made. It sat in the tank room of the milk barn for years. I remember Daddy making the table and recall it getting painted with a barn red paint. Mike has been wanting me to paint it since the day we brought it home! 

Back in the summer when we were painting the other back porch furniture, he asked once again if I had plans to paint it and wouldn't I like to put it up on the porch rather than have it sit down on a concrete pad just off the porch. I'd kept it there to use as a potting bench and the dirt that fell through it didn't bother me since it wasn't up on the porch where we walked in and out each day.

I needed more paint to finish up a couple of things and picked the paint up at our local Ace Hardware. On a warm, sunny day, I dragged the milk barn table out into the grass and gave it a good once over with a wire brush. Then, I washed it off and let it dry before giving it a nice coat of paint to match everything else on the back porch.


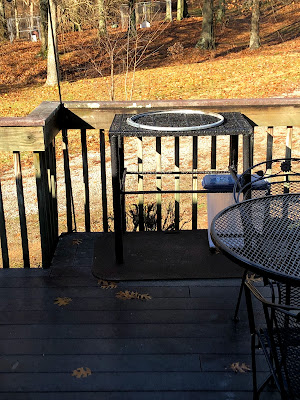
After a thorough paint job, I asked our son in law to move it up onto the porch for me because it is quite heavy! He put it near to Mike's grill so that it can be handy for holding things when he is doing his outdoor cooking this next spring. I realized that I hadn't made a photo of the finished product when I noticed it sitting out there one morning after a shower of rain. 

I loved how the little droplets of rain on it made it look like it was covered in diamonds! Truly, I do think of it as a diamond. I remember resting drinks, medicines, phone books, and even a baby carrier with Bryan sleeping on it while I was milking cows. The fact that Daddy made it even though it is a rudimentary piece of utility furniture makes it even more of a diamond to me!

Wednesday, July 15, 2020

Summer Project #3

Before school was out, I had decided that I needed to paint the back porch furniture because it was looking kind of ratty.  Some pieces had paint worn off, some were starting to rust a bit, some had a grey fungus growing on them like is growing on the bark of the trees in the back yard, and some had some greenish grey mold-looking stuff on them.  


So, the first thing I did was get a bucket of soapy water, line up the chairs, and begin scrubbing.

I quickly got hot, sweaty, and a bit wobbly due to my not being accustomed to being outside of the air conditioning, getting older and out of shape, and Mike says I was going at it like I was killing snakes.  So, when I came inside to rest and cool off after scrubbing all the chairs, he picked up his phone and called a neighbor.  He lined up a young high school boy to come give me a hand.  So, I scrubbed a couple more pieces and the young man showed up for duty.

I had estimated how many cans I thought would be needed and placed a large order to be sure I had enough paint on hand.

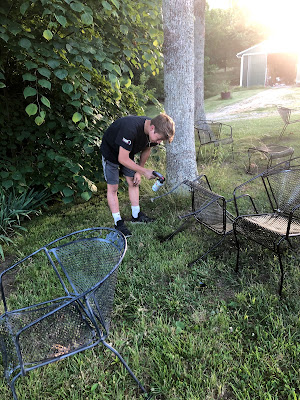
Cole tackled the job with gusto by stacking up four or five chairs and carrying them out into the yard under a shade tree where I indicated I'd planned to paint. 

He painted all I had scrubbed and promised to come back another day to finish up and return everything to the porch.  He even assured me that he could scrub the pieces that I had left.  So, in a day or so, he returned and finished up the painting.  Then, came a day or so later and put everything back into place.


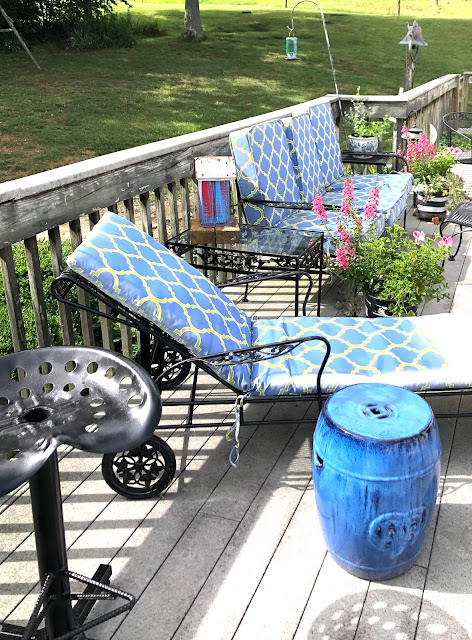
It all looks so much better!  I never dreamt it would turn out looking so nice.  It almost looks brand new!

A couple of days later, I decided that I needed to use the four left-over cans of paint to spruce up my plant stands.  So, I lined them all up and gave them a good scrub.  I came inside to cool off and eat a bite while they dried.  Then, I took them out under the shade tree and gave them a coat of paint.


I also unintentionally gave my feet a coat of paint and some of it bled onto my flip-flops and, sadly, they did not look nearly as good as all the furniture did with a coat of paint!

Tuesday, July 30, 2019

A Metamorphosis

Mike and I are fortunate that we have a full house of nice furniture.  When we married, he had an antique bedroom grouping and I had a couple of them.  Nothing was a 'set' but we had things that meshed well together.  When we started off housekeeping, we used the antique bed and side tables that had been his grandparents' and an antique dresser and chest that I had bought when the children were little, to set up our master bedroom.  All the pieces were oak and seemed to fit together well.

Recently, we decided that we were ready for an upgrade with our bed.  We decided that a king-sized bed might overpower the room and a queen-sized bed would probably be large enough anyway.  Yet, the remaining furniture in the bedroom is antique and most is oak.  So, it needed to fit well with the furniture we already have.  

I first thought that I would like something with cane in the headboard and footboard.  


However, Mike liked the size and bulk of the headboard and footboard of the bed we have been using.  He said my examples looked "too spindly."  So, I kept searching.

We also knew that we wanted something wood and strong and sturdy.  So, no metal or brass bed was part of the search.  I also was struggling with wood that would fit with the rest of the antique furniture.  Finally, I showed Mike some painted and antiqued beds and he seemed to think something of that nature would work.


I searched Craigslist and Facebook Marketplace thinking I might find something second-hand that would be less expensive, since I didn't want to spend an inheritance on a simple bed.  So, I surfed and surfed but nothing really seemed to work that was reasonably priced as well.

Then, one day as I was driving down the road to the hardware store to pick up materials to work on a project that was thrust upon me, I noticed this bed at a nearby second-hand furniture place.  I slowed and gave it a look but kept going because I was mid-project, after all.

Then, as I drove by on my way home, I slowed and looked once again to see if I thought it had potential.  So, I turned around and went back to take a closer look.
I moved in a little closer to check out the sturdiness of it and the shop owner walked by and asked if he could help me.  I saw this.
Even though I thought the price was affordable for me to take on as a project.  Even though I hardly ever negotiate or try to talk a seller down.  I asked, "What is your bottom dollar on this bed?"  He dropped the price and asked if he could load it on my truck!

So, mid-closet-project, I came home with this beaut.  When Mike saw it in the back of my truck, he was somewhat less than thrilled.  I think he mainly felt that way because it was a hundred and eleventy degrees and he didn't want to have to help me unload that sucker.  Yet, when we got it up onto the porch, he was convinced that it was substantial enough to fill that "strong and sturdy" criterion and even said he thought it would be pretty painted up.  Plus, the price was much easier to handle than anything I had found in my constant surfing.

So, I wrangled it around onto an old sheet and slid it under the bed in our bedroom and went back to work on the closet.  It lay there nagging at me for a couple of weeks!  Plus, my back was aching and pining for new support each night since I was spending more time on the firm cushion of the couch than the crowded, soft, confines of the full-sized bed.

When I would sit down each evening after my shower, I would have my nose online reading about different paints and finishes and methods.  I finally settled on using chalk paint because I thought it would be the least amount of prep and work.  I mentioned this to a couple of people in the second-hand selling world and they suggested that I needed to do something to prevent the orangey finish from bleeding through the paint. So much for quick and easy.

I watched YouTube videos and I read blog posts and I looked for inspiration and guidance.  I landed on this look as inspiration.  
Sadly, I cannot find where I stole this photo from!

Then, I went off to the hardware store for supplies.  I picked my paint color from the Amy Howard One-Step Paint line only to find that there was only one quart and I was afraid that this project might take more.  So, I decided to take a couple that I liked and mix them together.  I also decided that I would stick with the same paint line and used Clean Slate to clean it with before painting as a precaution for preventing the old finish bleed through.  On my way to the check-out counter, I saw that there was a random orbit hand sander on clearance.  So, I got that, too.  At that point, I realized I had invested more in my paint and finishing supplies than I had in the bed!

About half the tutorials I watched suggested either sealing the finish with a coat of something or sanding the finish until it gets 'a little tooth.'  So, I immediately went to work with the sander to scuff up the finish.    


I got the headboard, the footboard, and two of the post finials done and the pad of my sander broke.  So close to being finished!

I decided to persevere onward.  I wiped the dust off of every surface with a wet paper towel and left it setting on the porch for a while to completely dry.  Then, I wiped everything down with Clean Slate and let that dry.  At that point, I got a phone call which meant I would be spending a couple of days helping out at my son's house.  So, the entire project got put on hold for a couple of days.  

When I got back home, I jumped right in at getting the bed painted.  I mixed 1:1 Chelsea Square and Bauhaus Buff.  At Amazon, I had ordered some of the round brushes shown to be used by most of the tutorials I had scoured.  However, I kept seeing bristles and having control problems with them.  So, I returned to my trusty old Purdy angled brush and felt far more proficient with the painting.  I got the back side of the footboard painted by dragging it out to the back porch and laying it up on a sheet on the table.  Then, the skies clouded up and I had to move inside.  After a few sprinkles, I took the finials outside and gave them a coat of paint and decided that the rain had passed.  So, I drug the footboard back outside and gave the back side a second coat.  Then, the bottom fell out!  I had to quickly drag the footboard back inside.  I was not going to be outdone, though.  I spread out sheets and set up chairs and went after the front side of the footboard right there in my bedroom.

I continued on with the headboard after finishing the footboard.  When I had a break waiting for coats of paint to dry, I surfed online looking for a quilt to use on this larger bed.  I like not having a bed skirt.  So, I decided I would use a king-sized quilt.  I narrowed down my choices between the Amberly Spa Blue, the Blue Reversible Floral, and the Rowland Blue quilt set.  Then, I watched to see if any of them would be discounted on Prime Day.  Voila!  One of them was!

Then, I was ready for the side rails and the finials that had not gotten sanded.  I simply wiped them down good with Clean Slate and let it dry.  Then, I painted them up and, thankfully, there was no bleed through!

With everything covered in three coats of paint, I decided that I was going to start with the antiquing process.  I used the antique glazing mix that Cindy at Edith and Evelyn uses.  I found that I wasn't getting an even coverage.  So, I got a wet cloth and wiped everything I had glazed down.  I could control how much glaze I left on and how much I took off far better that way.  So, my method was to paint on the glaze.  Wipe it off with a dry cloth.  Let set a bit.  Wipe down with a wet cloth.  I was satisfied with the overall look of it and decided to leave it alone at that point.  Here is a comparison of the finished product along with the inspiration piece.
When I had achieved this look, I trekked off to a local mattress sales firm and ordered a new mattress and box springs.  Then, I stopped off and picked up a couple sets of sheets.  The mattress was due to be delivered in three days.  So, I thought I was ready.  Then, the day before delivery, I realized I had no bed slats to support the mattress and box springs!  So, I went off to Home Depot to get those.

Bryan and Jessica came by on Saturday to get the 'free' full-sized mattress and box springs we gave them.  As you know, there is no such thing as free in this world, though.  They helped us to set up the new bed and be ready for the delivery of the mattress and box springs the next day.  When the delivery was made on Sunday, I was almost like a kid on Christmas morning.  In retrospect, I wish I had gotten the low profile box springs so that the headboard would show more above the pillows.  However, I am so pleased with the look, the size, and the feel of my new bed.  I've decided to go with fewer pillows and a simpler look to dressing the bed and we will live with things the way they are.  I've got a bit of stitching to do to finish up the dressing for the bed.  I am making shams to coordinate instead of using the matching ones that came with the quilt.  I don't like matchy-matchy and they were king sized instead of standard size.  So, I will use them to make throw pillows for the window seat or something like that.  I will do a full post on what I come up with when I have landed on satisfaction.  Until then, here is the before and after comparison of the metamorphosis of our new bed.
Quite a difference, huh?

Evidently my confidence level was not very high with this project.  All my photos were made with my phone and the quality of the photos really shows.  However, the how-to aspect and the metamorphosis still show through even with phone shots.  I was paid nothing to use the products mentioned but I am pleased with the materials that I chose and the finish that I got with them.