If you change the way you look at things, the things you look at change.
Showing posts with label kitchen. Show all posts

Thursday, April 10, 2025

Projects - Kitchen Window Treatment


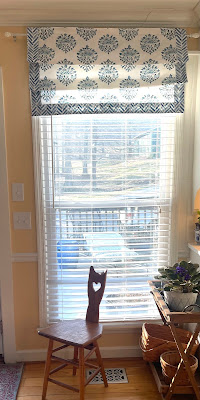
I did a little refresh on the kitchen recently. After seeing lots of block print fabrics featured in home decor, I decided to update the kitchen window treatment with a block print fabric. I shopped online and found a print I liked that I thought would cheer up the windows in the kitchen. Then, I ordered just enough to create a faux Roman shade for the two windows. I also ordered a nice print to use for trimming out the edges.

My fabric came from Spoonflower and I paid full price. I was not compensated by the company in any way. The fabric I chose is called Handblock Medallion 6 Blue on Whitney White Fabric. The contrast that I used for trim is called Indigo Blue Painted Chevron Herringbone. I ordered a length of both fabrics that was two yards in length. The fabric was 58 inches wide. I neglected to make photos along the way. So, I've created some diagrams to illustrate as best I can.


To begin, I measured the width of the window and added an inch. Then, I trimmed the selvage edge off of one side and cut the medallion fabric that width, plus one inch to allow for seam allowances. Next, I cut the fabric in half so that I had the same length for both windows. Then, I gave both pieces a quick pressing to get the wrinkles out. 


I trimmed the selvage edge off one side of the herringbone fabric, measured and cut 2 pieces that were a seven inch width and the full length of the fabric. These two pieces would form the trim for the sides of the shades.


Then, I measured up seven inches and cut a strip of fabric that was the full width of the fabric. And repeated that process so that I had two seven-inch strips that were a wee bit wider than the width of the medallion pieces. These two width pieces would form the trim for the bottoms of the shades.


I folded the two lengths that would form the side trim in half with wrong sides together and pressed. This resulted in two strips that had a folded edge on one long side and two raw edges around the other three sides. Then, I folded the two widths in half with wrong sides together and pressed. This resulted in two widths hat had a folded edge along one side and two raw edges around the other three sides.

Now it was time to assemble the shades. I placed one of the folded strips on the left back side of the medallion piece and the other folded strip on the right with the folds toward the center of the medallion piece. The cut edges of the medallion piece and the folded pieces were flush with one another.


Then, I stitched down both sides using a half-inch seam. Next, I pressed the seam allowance toward the front of the medallion fabric. Then, pressed the herringbone fabric over to the front of the medallion fabric.


Then, I stitched along the fold of the herringbone fabric. The stitching is 1/8th of an inch from the folded edge. That encased the raw edge of the seam inside the trim.

The next step was to trim out the bottom of the shades. So, I lined up the raw edges of the widths of the herringbone fabric to the raw edge of the bottom of the in-progress shade, leaving about an inch overhang on each side. The herringbone strip is on the back side of the shade-in-progress.

I stitched the bottom trim to the back of the shade-in-progress using a half-inch seam. Then, folded and pressed the seam allowance toward the medallion fabric and folded and pressed the trim piece toward the center of the shade.

Next, I stitched along the folded edge of the bottom trim 1/8" from the fold. Then, I folded the raw side edges under twice to encase the raw edges inside and stitched those edges down as well.

At the top, I created a rod pocket by cutting a four inch strip of the herringbone fabric. I laid this strip atop the shade with right sides together and I stitched a half inch seam, making sure to have at least a one-inch overhang on each side.


Then, I folded the side edges over a half-inch and then a half-inch again and stitched that edge down to enclose the raw edges.


Next, I folded the raw edge of the rod pocket under a half-inch and pressed it. Then, I folded the rod pocket strip over to the back and pressed the seem connecting the rod pocket and the shade down to have a crisp edge with none of the herringbone fabric showing on the front. 

I stitched the folded raw edge down to create the tube on the back to hold the curtain rod, stitching 1/8" from the folded edge. Then, I stitched a line across the shade from side to side one inch above that. This gave me a nice little header above the space where the curtain rod would slide through.


This method left me with no raw edges and a smooth completed finish. After that, I determined how deep I wanted the folds of the shade to be. I sewed a small plastic ring at the fold near the edge of the shade for each 'pleat' that I wanted folded up. Then, I sewed another plastic ring on the opposite side near that edge and another ring in the center. Finally, I cut a short piece of cording and tied the rings together to form the folds. I ran the curtain rod through the rod pocket and hung the shades.


I decided I liked the look so much that I also wanted a faux shade above my sink. However, I didn't have a wide enough piece of the medallion print to fit the window. So, I took the piece that I had and matched the pattern to form a strip wide enough to go across the window. I finished the sides and the bottom the same way I had for the large window shades and hung it on a tension rod pushed between the cabinets.


The window treatments seemed to finish off and add a cheerful note to our updated kitchen. Even the mister commented that he really liked the new look!



Saturday, July 11, 2020

Summer Project #1

Summer has traditionally been the time when I work on projects and get things done. Most of them are home-improvement-type endeavors where I'm organizing or repairing or updating or simply making something work better around the house.  My first project was out of necessity.  The drain hose for the dishwasher cracked and was leaking.  So, one day there was a puddle in the kitchen floor.  I mopped up and did some investigating under the kitchen sink only to find water standing under there as well.  First, I cleared everything out from under the kitchen sink and mopped up all the water.  I left it to dry overnight and called a plumber.  

In the meantime I went online and ordered some clear plastic bins that would organize the cleaners, jars, etc. that I store down there.  I was inspired by Ann at On Sutton Place.  She talked about how the handle made it easier to pull out the items that were in the back.  So, I found these nice see-through bins and ordered these as well.  After weeding out the junk and throwing some things out, this is how my tidy under-the-sink cabinet looks:
  • The left-hand cabinet has a trash can and a container that holds dishwasher pods. (You can see the pod container there on the left with the green label.)  
  • That is one of my scrubbing brushes sitting on a clear plastic coaster right in front.  
  • The clear bin right behind it is 14.5" long and just fits in that space with only about a hand's width to spare.  In the front, it has a tub that contains silver polish, brass polish, tooth paste for cleaning spots on silver, and that sort of thing.  In the back of that bin are oils for my butcher block counter top and cutting boards and front porch rockers.  
  • On the right, I have two of the bins with handles.  The one in the back holds some empty jars and a couple of empty cans that can be used to discard something like bacon grease when I need something of that sort.  The front bin holds extras of dish soap and hand soap to refill the containers on the counter by the sink as well as window cleaner and the gloves I use for hand-washing pots and pans.  I also have an empty spray bottle in it for when I mix dish soap and vinegar to clean things.
The next project turned out to be sort of a consolation prize.  I had hoped to redo and update our kitchen this summer but we decided that our budget just wasn't ready for that, yet.  Plus, there is the Coronavirus and we just didn't feel good about having folks coming in and out of our house.  So, I decided that I would just make the things we had work better for us!

I had gotten frustrated with spices and things falling out of the cabinet every time I tried to get something out for cooking.  It seemed that every time I reached for one thing, another couple of things fell out as well.  So, again, I decided it was time to organize and followed Ann's advice! I ordered more of the clear bins with handles that stick out, a couple of these turntables, and large jars and small jars.  I hate I didn't take a before picture but these two will give you an idea of some of the jumbled up conglomeration that I had up there:

I threw out things that were out-of-date or simply looked yucky.  I combined a couple of containers into one jar when I had more than one opened.  It was really quite rewarding to get this spiffed up! I wiped down the cabinet and shelves and placed the turntables inside and filled them up!
  • The bottom shelf has spices that we tend to use most on the turntable.  The jars behind the black pepper container are baking soda, baking powder, and corn starch.  There are a couple of bottles of flavored oils and a bottle of vegetable oil along with salt for refilling the shaker and some vegetable spray.  All tidy and within quick reach when cooking.
  • On the middle shelf, the turntable holds spices that we use less frequently.  On the right are jars with tea bags, cocoa mix, lemonade mix, and bottles of different extracts and flavorings such as vanilla, almond, maple, etc. 
  • I followed the advice that I read online in several places and put the items on the top shelf in clear bins with handles to make them easier to take down.  One bin holds bar-b-que rubs and it is in the middle because it is most frequently used by Mike as well as me. 
    The one on the right holds sprinkles and sugars for baking with/for the Grands.
The one on the left holds extras for refilling the jars.

I smile every time I open this cabinet now!  Everything is easy to find, easy to access, and easy to return to it's rightful place.  

I still hope to update and revamp my kitchen someday and when we do I will still be able to use these bins and turntables and jars.  For now, making our kitchen work efficiently for us and tidying it up are good enough.

Tuesday, April 23, 2019

Kitchen Updates

From the first moment I walked into our house, I knew that I wanted to do some updating and make-overing - especially in the kitchen!  I began gathering and pinning inspirational ideas and keeping hard-copy magazine photos to provide me with ideas and guidance.  Below are some of the ideas that I have dubbed as my favorites for a place to start - my kitchen island.


Do you see a theme developing?  I landed on a couple of ideas and began to think and ponder and plan.  Now, let's take a look at where we started.  This was the look of the kitchen the first time I walked in the door.  Get ready!

I knew that this wonderful space had potential.  I knew that It would take some time and money.  I knew that I was going to have to take this at a turtle's pace.  Slow and steady.

So, I started by just covering up all that fruit.  ALL.  THAT.  FRUIT!  Paint is a wonderful transformer and is relatively inexpensive.  So, I started with a simple couple of gallons of paint.  I chose a light yellow color because I liked the color found in the rocks of the fireplace.  It was a bit of sunshine and that is exactly what this place needed!

Mike liked using the island as a place for us to eat since there are just the two of us and it was closer to the fridge and stove than the table which sits across the room.  I'm one who likes to sit across from my dining partner because I think it leans toward conversation better.  We lived with that for a few years.  Then, I moved my old kitchen table into this kitchen for when one or two of the grands stays with us and we still ate informally at the island and the table.

Last year I got the wild idea to turn the island around where the drawers faced the oven and Mike and I began sitting at the table where we were facing one another.  That made me much happier.  Then, I got to thinking about the overhang on the island and how it was wide enough to cover a bookcase.  So, my search for inspiration was amped up a bit.

I did some thinking and figuring and decided that I could tackle adding a bookcase to the island on my own.  I mapped out a plan with a couple pieces of inexpensive pine shelving, some trim, and a piece of bead board paneling.  So, I measured things out and talked it out with Mike and headed off to the local big box building supply store - Home Depot.  I also bit the bullet and ordered a long piece of butcher block counter top and that ugly green counter top was on it's way out.  Yahoo!  I met up with a couple of guys who did the cutting of my wood pieces for me and headed home on a Friday afternoon.

The next morning I trucked down to the local Ace Hardware store.  The guys there mixed me up a couple of quarts of Hale Navy by Benjamin Moore.  When I got home, I gave everything I thought I was going to use a couple of coats of paint.  I immediately fell in love with that deep, rich, navy color.

After a couple of days to allow the paint to dry thoroughly, I pulled out my drill and began to add a few screws to my painted pieces and joined things together.  I wanted it to be simple but really wanted the bead board detail like I envied in Marion Parsons' butler's pantry and Ann Drake's island.  I think that little detail really makes a difference - and it cost no more because of the size of the bead board sheet. Win!  Win!
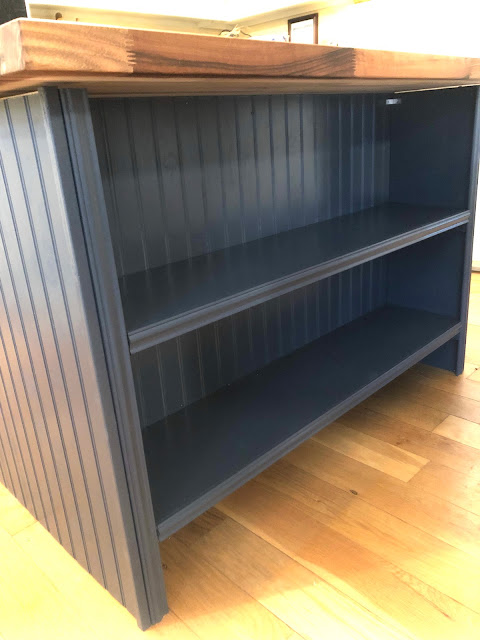
I used a piece of 1 x 2" to make the shelf supports and put them on either end of the shelving and along the back on the bead board.  So, the shelves are quite stable and shouldn't sag even with lots of cookbooks on them.  My initial plan was to add baseboard around the bottom but Mike didn't seem to like that idea.  So, I bumped the bottom shelf up a bit so that Rosie, our robotic vacuum can easily slide under there to clean up the crumbs and dirt.

I bought a nice beaded trim to cover the shelf supports and to beef up the front side of the shelves as well.  Again, a little detail that isn't really needed but I think it certainly finished things off and made it look more polished.

Since I had planned to use baseboard, I had planned to hide the bottom shelf edge behind it.  So, at the last minute, Stephen, my bonus son, cut a piece of the left-over trim to face that shelf to match the top one.  He wanted to give me time to paint it before he used his little micro-nailer to attach it but I convinced him that I could paint the little bits of trim after he attached it and wap, wap, wap he did!  I was kind of amazed at the size of those little nails he used.  I think they are about the same fine guage as insulin needles!  T-I-N-Y!

Mike has a friend who works in his son's cabinet shop.  So, he asked DeDe to come get the counter top and cut it to size.  He was generous enough to do that and to sand the edge smooth as well.  So, Stephen muscled the piece we needed in and crawled into the cabinet with his drill and attached it with a couple of screws.  Voila!  A beautiful transformation!

I did a bit of touch-up painting.  Then, used some Howard Cutting Board Oil to begin water-proofing the top.  I used three generous coats of the oil and it was soaked up like the wood was a sponge.  I also just swooned at the way it brought out the beauty of the wood.  Next, I added three coats of Howard Butcher Block Conditioner.  

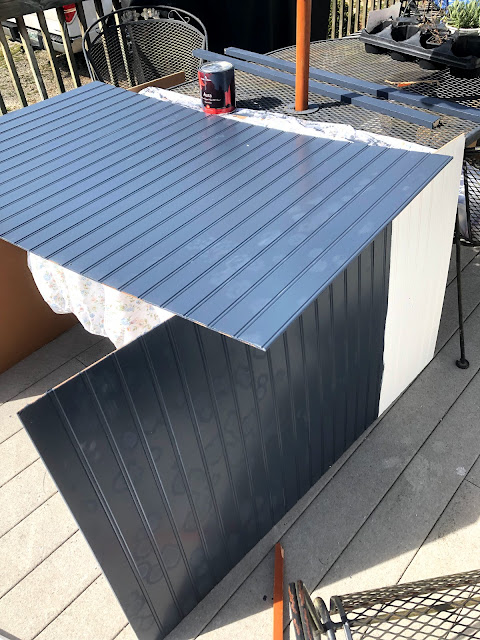
I painted the base part of the cabinet where the drawers and doors are and the drawer fronts right away.  However, I waited a couple of days to paint the doors where I could take them outside and have plenty of space for them to lay out flat.  My plan was to use a foam roller and brush on the doors so that there would be no brush strokes that showed.  However, it still seemed to look a bit streaky when I painted the grooved areas and the raised outside edges of the paneled doors.  So, I decided that I'd rather see brush strokes than have a streaky mess, too. 

At this stage I was so excited and loved the new look of our island!  The shelves were beautiful with that bead board back and beaded front trim.  I caught myself just wandering into the kitchen to smile and admire it!

A close-up look shows just how beautiful and rich that deep color and trim and bead board truly is.

I added some of my cookbooks and some pretties to dress it up a bit.  I'm not certain that all of this will stay that way but it works for now.  Probably when I have time this summer, I will do some adjusting and add a few more of my cookbooks.

On the back side - the side facing the oven, I added the same white porcelain knobs back.  I'm not certain that will stay but, for now, I like the clean, simple look.

One more look at that bead board and shelves and trim.

An over all look with my galvanized tray to corral a few regularly needed items.  I will add another coat of the conditioner sometime this week and then, again each week for a while.  After a while, I will simply need to add a coat about once per month and it will be water resistant.

And here is our everyday look.  Comfy and cozy.  A true farmhouse kitchen because, after all, we do live on a farm!

P.S. I already have a project in mind for the next step.  And, I may or may not even have a couple of boxes stacked in the back bedroom.

Wednesday, March 20, 2019

Chair Refresh

I thought burlap was a rugged fabric that would serve well on the chairs Mike and I use daily for dining.  When I picked up these chairs last year, I was thrilled with how the burlap seemed more fitting for a farmhouse kitchen and thought it would serve us well.

Now, less than a year later, this is how they look.

Mike's chair started showing wear at around Christmas and the burlap has just continually become more threadbare till there are big holes appearing.

My chair didn't start showing the wear as quickly but once it did show a bit of wear, the holes quickly followed. 

So, I decided that spring break would provide me plenty of time to give them a little attention.  I mulled over what type fabric I wanted to use because I don't see a need to use burlap again if it is going to wear out so quickly.  I considered getting a linen or using a drop cloth.  I also considered using a floral that I used to line the shades in the kitchen.  However, I liked the quiet neutral quality of the burlap and wanted something similar to it. 

Then, one day I remembered that I had a remnant of fabric I had picked up a few years back at Sirs.  (Gosh, I miss that place!)  I thought it was enough to do at least the three chairs that don't have arms which we use in the kitchen.  I brought it out and draped it across one of the chairs and decided it might work. 

With the bright sunshine calling me yesterday, I jumped into my chair updating project.  I thought I'd get that knocked out in less than an hour.  Boy!  Was I ever wrong!  I had forgotten that the hard part of covering furniture is removing the old cover. 

I had to study the under side of my chairs a bit because I knew that it was just a matter of removing a few screws to get the seat off.  However, I never dreamt that the screws would be really long like they were.  I finally became pretty certain of which screws were holding the braces to the chair frame and which might be the best candidate for holding the seat on and gave it a go.  The seat came off quickly and easily.  Then, it was time to remove the staples that were holding the burlap on.  All.  Those.  Staples!

I got a screwdriver and began prying them up and pulling them out with pliers.  My goodness, that is a job!  Eventually, I got them all removed.  I think I could have just tugged at the burlap and most of it would have come off without removing the staples but I wanted a clean surface before I reapplied a new cover.  So, they all had to come out.  The original tan cover was still intact on the cushion showing all its sadness.  There were stains galore there but it made for a good base cover to protect the padding and I decided to leave it there just like the upholstery person before me had done.

I laid the burlap out onto my fabric and cut a large enough square to cover my chair seat.  Then, my trusty manual staple gun and I went to work stretching the new fabric and attaching it with staples.  I do not have the strength I once did when I wrestled with cows or tossed hay bales around.  So, I had to also hammer each of the staples down into the plywood seat to make certain they were snug and strongly holding the fabric in place. 

I'm pleased with my finished product and my updated chairs.  They are still casual and quiet in a room filled with chairs and I like that.  I also like the freshness that the new fabric covering brings.  My stiff arthritic hands certainly hope these covers last longer than a year!