Hope your day is a happy one!
If you change the way you look at things, the things you look at change.
Friday, April 26, 2019
Tuesday, April 23, 2019
Kitchen Updates
From the first moment I walked into our house, I knew that I wanted to do some updating and make-overing - especially in the kitchen! I began gathering and pinning inspirational ideas and keeping hard-copy magazine photos to provide me with ideas and guidance. Below are some of the ideas that I have dubbed as my favorites for a place to start - my kitchen island.

Do you see a theme developing? I landed on a couple of ideas and began to think and ponder and plan. Now, let's take a look at where we started. This was the look of the kitchen the first time I walked in the door. Get ready!
So, I started by just covering up all that fruit. ALL. THAT. FRUIT! Paint is a wonderful transformer and is relatively inexpensive. So, I started with a simple couple of gallons of paint. I chose a light yellow color because I liked the color found in the rocks of the fireplace. It was a bit of sunshine and that is exactly what this place needed!
Mike liked using the island as a place for us to eat since there are just the two of us and it was closer to the fridge and stove than the table which sits across the room. I'm one who likes to sit across from my dining partner because I think it leans toward conversation better. We lived with that for a few years. Then, I moved my old kitchen table into this kitchen for when one or two of the grands stays with us and we still ate informally at the island and the table.
Last year I got the wild idea to turn the island around where the drawers faced the oven and Mike and I began sitting at the table where we were facing one another. That made me much happier. Then, I got to thinking about the overhang on the island and how it was wide enough to cover a bookcase. So, my search for inspiration was amped up a bit.
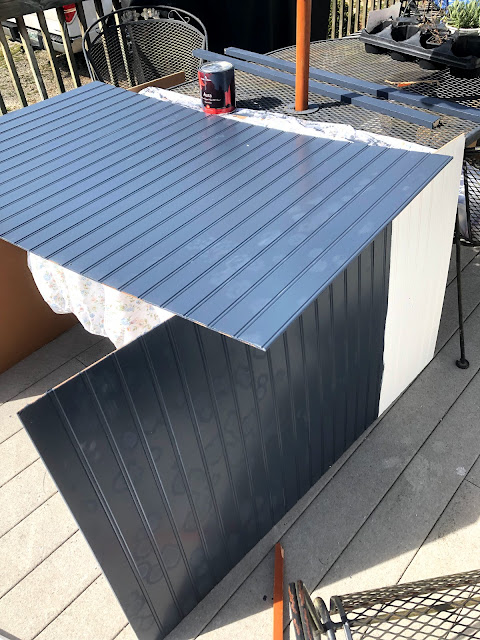
The next morning I trucked down to the local Ace Hardware store. The guys there mixed me up a couple of quarts of Hale Navy by Benjamin Moore. When I got home, I gave everything I thought I was going to use a couple of coats of paint. I immediately fell in love with that deep, rich, navy color.
After a couple of days to allow the paint to dry thoroughly, I pulled out my drill and began to add a few screws to my painted pieces and joined things together. I wanted it to be simple but really wanted the bead board detail like I envied in Marion Parsons' butler's pantry and Ann Drake's island. I think that little detail really makes a difference - and it cost no more because of the size of the bead board sheet. Win! Win!
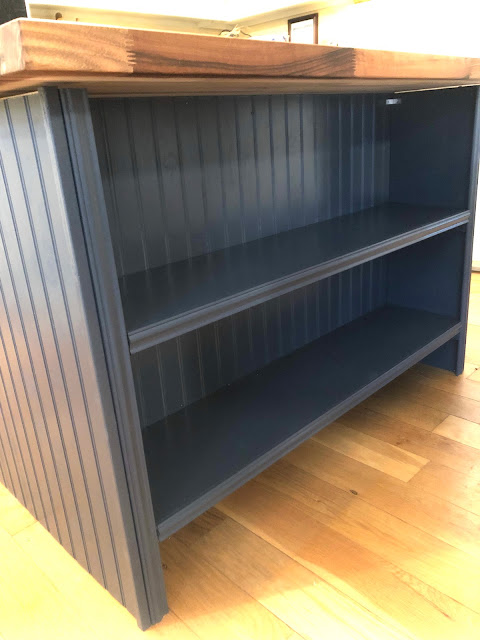
I used a piece of 1 x 2" to make the shelf supports and put them on either end of the shelving and along the back on the bead board. So, the shelves are quite stable and shouldn't sag even with lots of cookbooks on them. My initial plan was to add baseboard around the bottom but Mike didn't seem to like that idea. So, I bumped the bottom shelf up a bit so that Rosie, our robotic vacuum can easily slide under there to clean up the crumbs and dirt.
I bought a nice beaded trim to cover the shelf supports and to beef up the front side of the shelves as well. Again, a little detail that isn't really needed but I think it certainly finished things off and made it look more polished.
Since I had planned to use baseboard, I had planned to hide the bottom shelf edge behind it. So, at the last minute, Stephen, my bonus son, cut a piece of the left-over trim to face that shelf to match the top one. He wanted to give me time to paint it before he used his little micro-nailer to attach it but I convinced him that I could paint the little bits of trim after he attached it and wap, wap, wap he did! I was kind of amazed at the size of those little nails he used. I think they are about the same fine guage as insulin needles! T-I-N-Y!
Mike has a friend who works in his son's cabinet shop. So, he asked DeDe to come get the counter top and cut it to size. He was generous enough to do that and to sand the edge smooth as well. So, Stephen muscled the piece we needed in and crawled into the cabinet with his drill and attached it with a couple of screws. Voila! A beautiful transformation!
I did a bit of touch-up painting. Then, used some Howard Cutting Board Oil to begin water-proofing the top. I used three generous coats of the oil and it was soaked up like the wood was a sponge. I also just swooned at the way it brought out the beauty of the wood. Next, I added three coats of Howard Butcher Block Conditioner.
At this stage I was so excited and loved the new look of our island! The shelves were beautiful with that bead board back and beaded front trim. I caught myself just wandering into the kitchen to smile and admire it!
I added some of my cookbooks and some pretties to dress it up a bit. I'm not certain that all of this will stay that way but it works for now. Probably when I have time this summer, I will do some adjusting and add a few more of my cookbooks.
On the back side - the side facing the oven, I added the same white porcelain knobs back. I'm not certain that will stay but, for now, I like the clean, simple look.
One more look at that bead board and shelves and trim.
An over all look with my galvanized tray to corral a few regularly needed items. I will add another coat of the conditioner sometime this week and then, again each week for a while. After a while, I will simply need to add a coat about once per month and it will be water resistant.
And here is our everyday look. Comfy and cozy. A true farmhouse kitchen because, after all, we do live on a farm!
P.S. I already have a project in mind for the next step. And, I may or may not even have a couple of boxes stacked in the back bedroom.
Sunday, April 21, 2019
Wednesday, April 17, 2019
Happy Anniversary!
From here -
to...
How did all this happen?
Hope your day is as full of smiles and sunshine as it was all those years ago! Happy Anniversary!
Subscribe to:
Comments (Atom)


