

Thursday, December 31, 2015
Anniversary Number Six
Tuesday, December 29, 2015
Spiffed-Up for the Season Part 2
Yesterday I shared the front porch and den decor in our house this year in Spiffed-Up Part 1. Today, I'll take you around other parts inside the house.
I did a wee bit of decorating in the master bedroom.
 Some holly garland draped over our antique headboard and a couple of photos of the grands with Santa add seasonal cheer here.
 More holly greenery swags over the bay window seat. (Why didn't I notice that the blind was all wonky like that and straighten it up?)
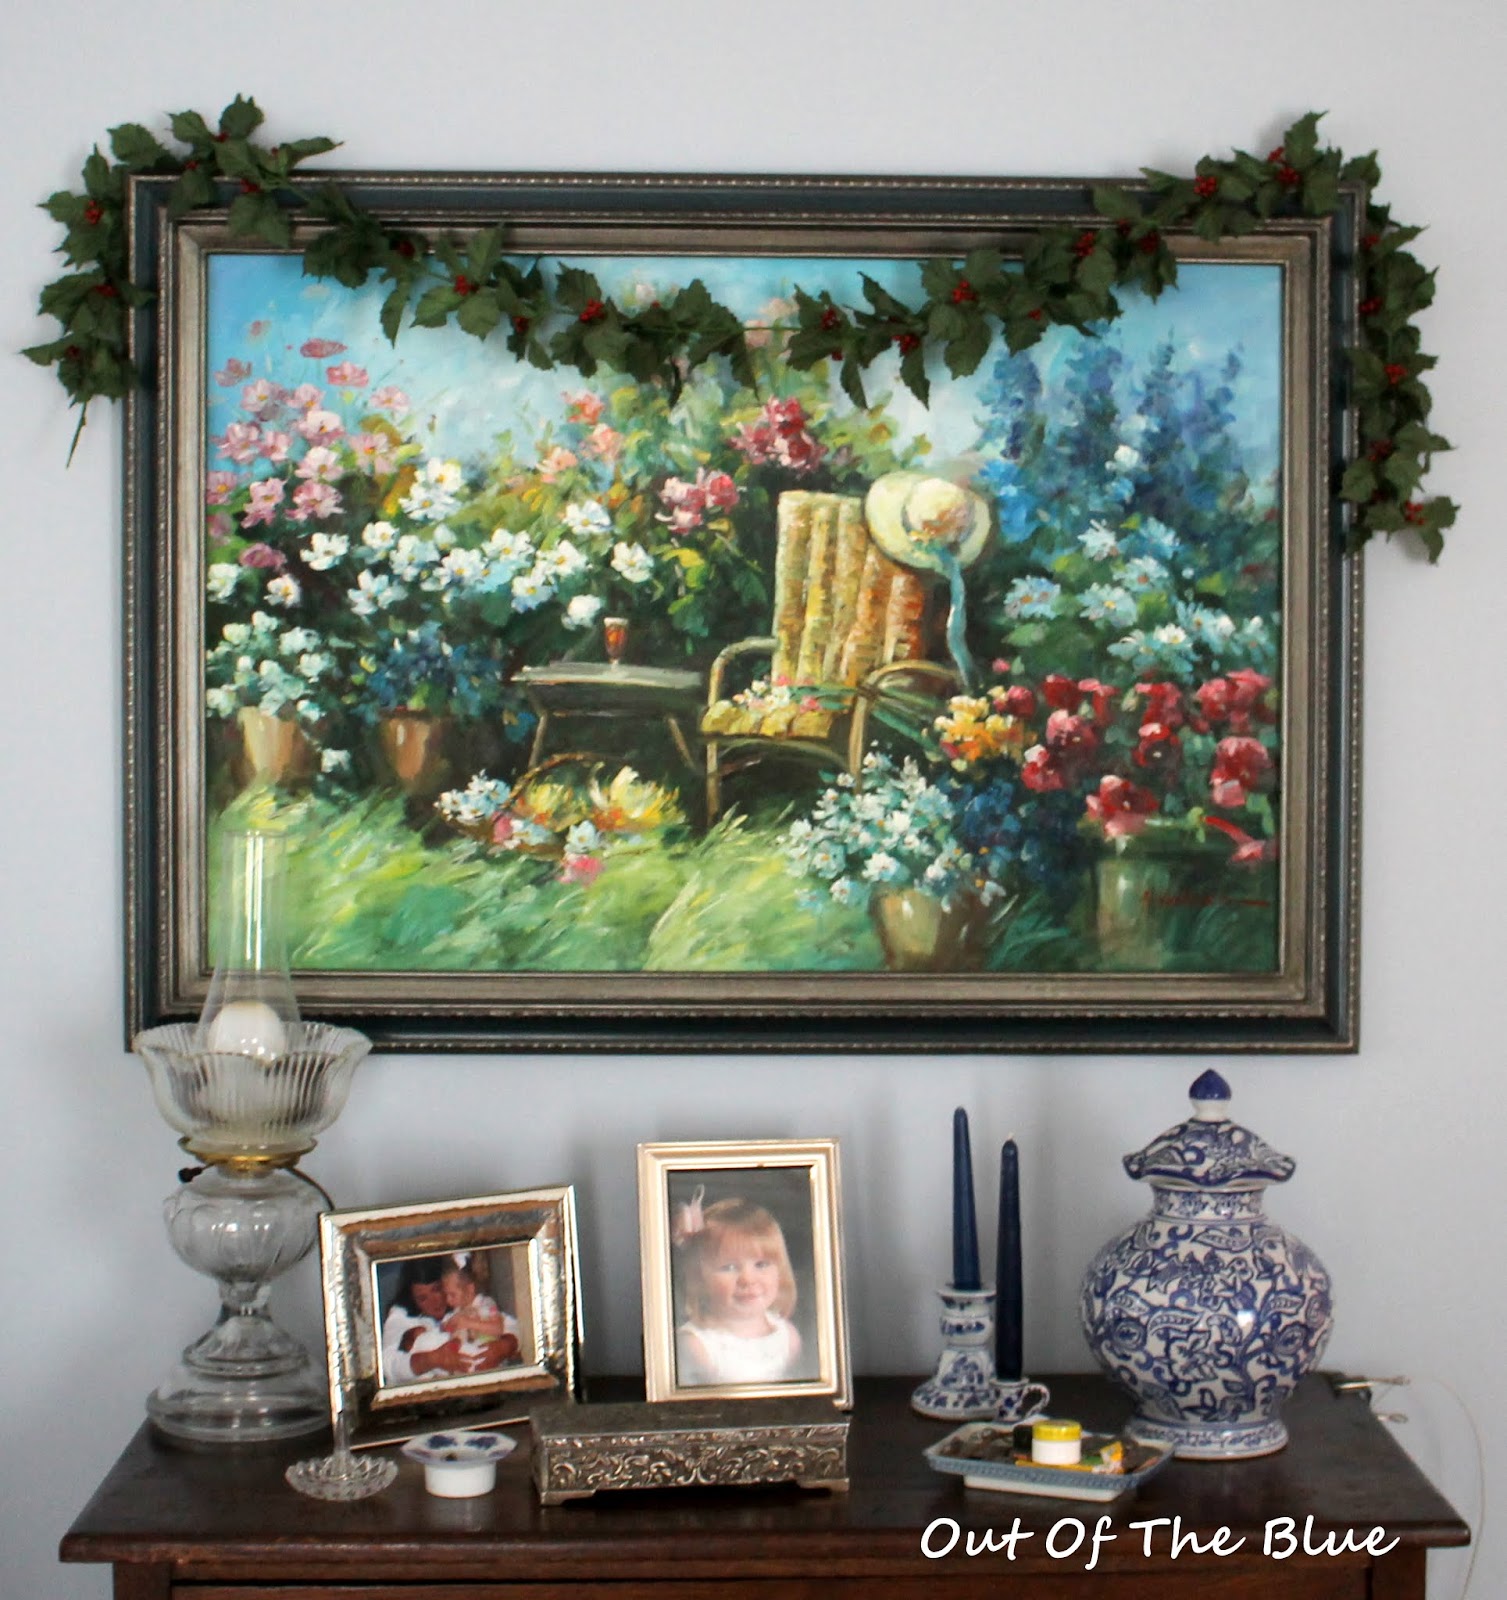
 There's also a bit of greenery swagged across the floral painting over our dresser. Simple and cheerful, that is plenty for this space.
In the kitchen, I also kept it simple. I incorporated the holly garland atop the mantel. There is a pair of stockings Mike's mother hand-chrocheted.
 I also hung a large red and green china ornament and a sweet little red ribbon Merry Christmas ornament on the center of the mantel.
 The little table-top Christmas tree is festooned with cranberry red beaded garland and many hand-crafted ornaments collected through the years. There are painted wooden ornaments, purchased bread-dough ornaments, wire ornaments, gift ornaments, and a paper-crafted ornament made with the granddaughters this year.

There are also pipe-cleaner candy canes that were twisted and curved by Bridgette and Bryan when they were little fellows. This tree sets in a basket alongside the blue-and-white bowl which holds another strand of cranberry wooden beads and tin cookie cutters. A couple of appliqued Christmas towels brighten up the chopping block that tree sits upon.
 A simple blue and white bowl sitting amongst some holly garland, glittery pine-cones, and glistening branches within the wooden tray on the gingham runner is all I put on the dining table this year.
 The bowl is another one of my favorite junking finds with a beautiful snow scene in the center.

At the last minute, when I was searching for the red gingham table runner, I stumbled across my painted Christmas masterpiece. So, I just leaned her up on the china cabinet in the kitchen. I sort of felt like her this year - a bit overwhelmed by Christmas - the shopping, the decorating, all the preparation.
 I plunked some silk poinsettias, some greenery, and a sprig of red berries in the urn that sits on the island and considered the kitchen fully decorated.
 Rudolph stands sentry on one side of the kitchen door and a basket of silk greenery anchors the other.
 Going down the hallway, I draped a holly garland across a cross-stitch sampler my mother made.
 The guest bedrooms got the simple treatment as well.
 There is a miniature Christmas tree decorated with mini ornaments in each. The front bedroom where there are toys for the grands has the Disney tin and some sweet seasonal smelling potpouri.
 It also has a couple of snow globes alongside my childhood blue willow tea set.
 The back bedroom has one of the pretty glittery white ornaments, a church which reminds me of the local Methodist church.

 I'm so glad these have endured the years!
 The guest bath vanity has a tiny Christmas tree and a swag of holly garland across the mirror and across the print on the opposite wall.
 It also has a couple of the beautiful white and gold ceramic ornaments that were Mike's for years.
 This pair is Santa and his sleigh.
 I also discovered Harold, the Christmas angel when I was searching for the table runner. So, out he came and was hung on the inside of the front door. Believe it or not, I was much like Harold while I was decorating this year. Oh, there was the traditional cursing of the lights, like when half of one brand new strand wouldn't work and I replaced it with another. Then, when I hung the garland and new strand of lights, half of that strand quit working. Otherwise, it was a pleasant, cheerful task and I blasted Christmas music through our old-time Christmas CDs and sang and danced all the while I decorated! Hope your decorating was simple, easy, and enjoyable, too.
I did a wee bit of decorating in the master bedroom.


In the kitchen, I also kept it simple. I incorporated the holly garland atop the mantel. There is a pair of stockings Mike's mother hand-chrocheted.


There are also pipe-cleaner candy canes that were twisted and curved by Bridgette and Bryan when they were little fellows. This tree sets in a basket alongside the blue-and-white bowl which holds another strand of cranberry wooden beads and tin cookie cutters. A couple of appliqued Christmas towels brighten up the chopping block that tree sits upon.


At the last minute, when I was searching for the red gingham table runner, I stumbled across my painted Christmas masterpiece. So, I just leaned her up on the china cabinet in the kitchen. I sort of felt like her this year - a bit overwhelmed by Christmas - the shopping, the decorating, all the preparation.


A couple of plastic canvas needlepoint squares sit atop the shelves at the end of the hallway. Bryan learned to do these in elementary school and one year he crafted several.


Monday, December 28, 2015
Spiffed-Up for the Season
Before we usher the new year in, I thought I might share what our house looked like spiffed-up for Christmas. I didn't really do as much decorating as I have done in the past. I kept it simple and I think that made it much nicer - at least for my level of fatigue!
I started things off by adding faux garland and lights to the front of the house. After five years, I have sort of mastered how things can go up and come down easily. I replaced lights in the greenery last year. So, I was looking forward to a quick placement and moving on.

In the tub where I store the greenery and lights, I also added the pieces of white nylon twine that I used for attaching last year. So, this made things go much, much faster. As you look at the porch, I swag the greenery with lights entwined from the right side as shown in the photo above to the left and down the hand rail. Then, I attach the other side in the same way. Last, I stake the spotlights right out from the porch corners and run extension cords to connect everything to a timer which is plugged in next to the front door. Easy, peasy!
 This year I added lights to the wreath on the front door and wired the swirly monogram to it as well. I placed a basket of scented pine cones atop one of the milk cans by the front door and called myself finished. I guess the delivery guys enjoyed the scents of the season because I think they were the only ones who graced our front porch.
Next, I always tackle the mantel. We have personalized needlepoint and velvet stockings for every member of our family. So, that is plenty decorative for our den mantel.
 Each is different and they are each beautiful I think. I have some metal stocking holders that curve around the edge of the mantel. I slide a metal curtain rod through the loop that goes under the mantel and then slip each stocking onto the curtain rod. It is sturdy and holds them all well even when they are stuffed full.
 This year when I was pulling tubs and boxes off the shelves in the basement to bring upstairs for decorating, a bag fell off and landed on my foot. It was the glittery foam balls and pine cones that my daughter-in-law had used to decorate our mantel when Mike and I married.
 So, these were mingled with some silk holly garland pieces and laid right on top of the mantel. There are glittery sprigs, pine cones, and foam balls which look like snowballs glistening there and bringing cheer each time I glance that way.
 I draped a few swags of the silk holly across other places in the den to make it more festive as well. The dog painting above the sofa got a swag of holly and there was the addition of the green striped pillow as well. The coffee table vignette was simple since I knew grandchildren would be climbing and playing. I simply added a Mikasa china Christmas dish that was my Granny's to the tray on the ottoman.

It was a combination of two dishes since one of the lids was broken during moving and I simply stacked two like dishes there and used the unbroken top to make it be more of a stacked china dish. It really looks as if it was made for that.
 Another of the inherited china dishes was added to the end table between the sofa and chair. It is probably my favorite as it features a beautiful blue background, a French horn, and holly. I loved each of them from first sight.
 The third dish was added to a vignette on the entry table. In this basket a sparkling ball and pine cones were added to a blue and white pedestal dish and a sprig of holly was added to the cobalt blue glass basket.
 My Granny kept the dishes out year-round as decoration on the shelves of her office. I sort of like packing them away and bringing them out seasonally to showcase some of her beautiful things from time to time.
 We put the tree on this end of the den for a change. In addition to the basket update, I added a swag of silk holly to the tops of the children's portraits. The tree looks much like it has for years. I bought it years ago during a day after Christmas sale. It shows my love of blue, white, and silvery baubles. The silver beaded garland and a few simple blue and white decorations were purchased along with the tree. The other ornaments have been added over time.
 There are simple crochet snowflakes alongside enameled snowflake ornaments and small painted glass disks entwined with silver scrolls of wire.
 There are glittery clearance ornaments along with an embroidered felt angel that I stitched the year I was pregnant with Bridgette.
 I thought of my dear friend, Rhonda, and our trip to the Empire State Building and Ellis Island and chuckled at our trip through China Town on our visit to New York when we attended an educational conference together.
 This silver cone vase was a found treasure during a 'junking day' one year. I love stuffing it with feathers and a sprig of glittered eucalyptus. It is showy and prissy.
 This Hallmark ornament with Santa shushing and peeking in the window at a sleeping child is always a favorite memory for my children from their toddler days. It hangs alongside inexpensive plastic glittered stars, a German-glass-glittered icicle ornament, and some Longaberger pewter ornaments.
 This simple acrylic manger scene with a star sparkling down from the lights is also a favorite from the children's childhood. It hangs alongside another junking treasure, a glass-beaded ornament with attached prisms that sparkle.
 Other metallic finishes are also mingled in with the silver German-glass-glittered ornaments and pewter Longaberger angels and snowflakes. The center round ornament is from the Library of Congress and has a piece of copper in it which came from the original roofing material.
 The pewter ornament with a covered bridge scene was given to Mike by the company where he worked for most of his life.
 This pretty brass ornament features the local Methodist church where Mike attended growing up. It is surrounded by a glittery Fleur-de-lys and a pewter Christmas tree ornament.
 The first Christmas Mike and I were married, I did a bit of local shopping and attended the local Presbyterian Christmas Bazaar. I was excited to find three beautiful porcelain ornaments. One was this blue-and-white star/snowflake ornament.
 The other two are pale glazed blue and white. One has two little angels and the other has two Victorian dressed children.
 I like to think these represent a blending of our families. His two children as well as mine.
 Mike only had a small box of white ornaments when we married. This year, I set them up as little vignettes throughout the house. This one sits beside a basket holding our Christmas cards, a blue-and-white vase with some greenery and pine cones, and some framed family photos. It has a beautiful little Christmas tree, a snowman, and a Teddy bear riding a rocking horse.
As I started this post, I thought I'd kept things pretty simple this year. However, I find that even with the simple things, we have much to enjoy and many blessings. I'll follow up this post with other Christmas tours of the house.

I started things off by adding faux garland and lights to the front of the house. After five years, I have sort of mastered how things can go up and come down easily. I replaced lights in the greenery last year. So, I was looking forward to a quick placement and moving on.

In the tub where I store the greenery and lights, I also added the pieces of white nylon twine that I used for attaching last year. So, this made things go much, much faster. As you look at the porch, I swag the greenery with lights entwined from the right side as shown in the photo above to the left and down the hand rail. Then, I attach the other side in the same way. Last, I stake the spotlights right out from the porch corners and run extension cords to connect everything to a timer which is plugged in next to the front door. Easy, peasy!

Next, I always tackle the mantel. We have personalized needlepoint and velvet stockings for every member of our family. So, that is plenty decorative for our den mantel.


It was a combination of two dishes since one of the lids was broken during moving and I simply stacked two like dishes there and used the unbroken top to make it be more of a stacked china dish. It really looks as if it was made for that.


As I started this post, I thought I'd kept things pretty simple this year. However, I find that even with the simple things, we have much to enjoy and many blessings. I'll follow up this post with other Christmas tours of the house.

Saturday, December 26, 2015
Bean Bag Cubes: a story and a tutorial
I've had this craft pinned for a l-o-n-g time. I thought they were cute. I thought they would be cool to have. I thought they looked fairly easy to make. I thought...some day...
Well, this was the Christmas of the bean bags!
I took my handy-dandy coupon off to Hobby Lobby and purchased fabrics that made me think of each of our grands. I checked with this post and decided that I needed to purchase at least 3/4 of a yard of two complementary fabrics. This was the second hardest part of the whole entire process! I would land on a fabric that I thought was suitable for one of the little mite's personality and then struggled to find another complementary fabric. Finally, I settled on a couple for each child and spent only about $120 total on my fabric.
I did this in stages so as not to get burned out and frustrated. It also helped me to do a little bit at a time in the afternoons when I got home from work so that I didn't make mistakes from fatigue. Thankfully, I have a sewing room in the basement and could leave everything laying out and ready for the next day.
I started by cutting two squares that were at least half the width of the fabric. So, they were around 23" square. I also cut three strips that were 12" by 23" and then one strip that was 13" by 23". The squares would form the top and bottom of the cube and the strips would form the sides. I sent one of the squares home with my daughter, Bridgette, with instructions for monogramming each one.
In the meantime, I began sewing them together. With right sides together, I sewed the three 12"x23" strips to three sides of the square. For some of the fabrics, I had to be careful that the pattern was facing the same direction - like the truck fabric, for example.
Next, I cut the 13"x23" strip in half so that I had two 6 1/2" x 23" strips. With right sides together, I made a mark 4 1/2" from each end and stitched the two pieces back together using a 1/2" seam.

Then, between the marks, I stitched the pieces together using the longest stitch possible on my sewing machine for a basting stitch. This gave me a strip 12"x23" to form the other side for my cubes.

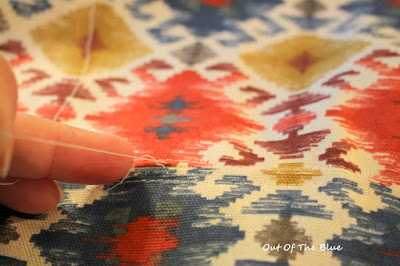
Next, I pressed this seam open. Using a needle and thread, I whip-stitched the end of the zipper together at the top. Then, I unzipped it a couple or three inches and laid it face down on the wrong side of strip just on top of my basted seam area, pinning it in place between my marks.

I pinned the zipper in place at a couple more spots along its length. Then, I went to the sewing machine. Starting at the top right of the zipper, I began to stitch it to my fabric strip, centering the teeth of the zipper along the seam line.

I tried to keep the edge of my zipper foot even with the edge of the zipper to keep my stitching straight. Having the zipper unzipped a bit allowed me to wiggle the zipper pull and helped to keep my stitching straight and close to the teeth of the zipper.

When I got just past the teeth of the zipper at the opposite end, I paused my sewing machine, making certain that my needle was down through the zipper and the fabric.

Then, I lifted my presser-foot and pivoted my fabric and zipper 90 degrees and lowered my presser-foot again. Then, I stitched and did a back-up stitch across the end.

Then, again leaving the needle down, I pivoted once again and stitched up the other side of the zipper.

When I got to the top end of the zipper again, I pivoted one more time and stitched and did another back-up stitch to secure the top end as well.

Using a seam ripper, I picked out a few stitches to expose the zipper. Then, I took the loose thread piece and pulled it out to reveal the entire zipper.
This was the first time I ever recall installing a zipper in all my years of sewing! I think they turned out wonderfully!

After installing the zipper, I stitched this strip to the final side of the square. I did this assembly-line style and they all wound up looking like the photo below.

This is one of the ones where I had to make certain that the pattern was all facing the same direction. In this case, I wanted all of the vehicles to have the tires toward the bottom piece as shown in the photo above.

At that point, I also decided I wanted to attach a handle to make it simpler for the grands to carry from place to place. So, I cut a strip of fabric about 4" x 10". I turned it with right sides together and stitched a 1/4" to 1/2" seam along the long side of the strip to form a tube. Then, I turned the tube right side out and pressed the seam to the back side. I turned under a half-inch on both ends of the tube. I top-stitched all around the edge of this strip keeping my stitching about 1/8" from the edge. Then, I centered the strip onto the side next to the zipper and stitched a rectangle on either end of the handle to hold it securely in place. You can see the handle on the side nearest the bottom in the photo above. I made it out of the contrast fabric for this cube because that fabric seemed a bit sturdier. For the others, I made the handle out of the same fabric as the sides so that it would blend in and not be noticable.

Next, I stitched the sides together one-by-one. I lined up each side with right sides together. and stitched from the raw, loose edge down to where the sides joined the bottom. Using the photo above, that would be stitching from left to right.

I folded the corner of the bottom side down as shown to make it come to a point. Then, I just stitched right up to the edge on both sides using a quarter-inch seam allowance. This made the three pieces of fabric join together to form a nice corner as shown in the photo below.

I did this with each of the sides to form a large bucket-type piece. The photo below shows one of the cubes at this stage. It is turned right-side-out and the sides are collapsed toward the center.

When my daughter had finished monogramming the tops, she sent them via special delivery by her hubby, Corey. So, my next step was to turn each 'bucket' wrong side out and unzip the zipper about half-way.

I pinned the monogrammed top onto the open sides, right sides together, matching up the corners and stitched the top to the sides.

Then, I pulled the entire thing through the opened part of the zipper to turn it right side out.

I used a little dowel to sharpen up and push out the corners.

I figured that the cubes would be about 4 cubic feet. Knowing that I wanted just a little bit of play in them to allow them to be more squshy for the grands to lounge on, I ordered bags of polystyrene beads that held 3.5 cubic feet.
Then, came the hardest part of all. I tried doing this by myself. I do not recommend that! It was disastrous! My back porch looked like it had been snowing before I figured out a decent method. Yes, there was cursing involved. Yes, there were tears. Then, I figured out a method and got a couple of them filled. However, my method was not fool-proof. So, I set it aside and waited for some help. Here is how my sweet hubby and I finally got them filled without further swearing or tears:
The beads come in a large cardboard box. Leave the bags in that box. Slice about a six-inch opening in the bag and place a rolled up piece of cardboard tightly into that slid to make a make-shift funnel.

Carefully fit the zipper around the cardboard make-shift funnel. One person should hold the opening up tight around the cardboard funnel while the other carefully lifts the box/bag of beads up to begin pouring into the cube.

Be careful with this because the plastic bag might split further and little polystyrene beads might go flying all over the place. Not that I would know this from experience or anything!
When the bag/box is about half-emptied into the cube, stop and take the bag of the remaining beads out of its box. Snip the entire end off of the bag to provide a clean opening. Stuff the open end of the bag down into the zipper opening of the cube. While one person holds the zipper opening of the cube, the other can tun the bag up and shake the remaining beads down into the cube. Work carefully as a team. Know that static electricity is going to be working against you and be patient. I wound up easing beads down toward the cube and wadding up the bottom of the bag to push them all down into the cube much like one would with a piping bag of icing when icing a cupcake. Then, gently ease the open end of the bag out of the cube and quickly zip the opening before a breeze catches the beads and blows them all over the back porch and yard. Not that I would know this from experience or anything!
They turned out to be really cute and the only hard part at all is stuffing them with the beads. However, having a partner to help with this process made it go 1000% faster and easier! I thought I would make them where the cover could be removed for washing but my advice is that once those beads get in the cushion, never, ever, never open it! In the future, I think I would stitch up a muslin cover to house the beads and make the cute fabric cover to go over the top of it.
This one features a cute lattice print of green, white and grey contrasted with a vehicle print.

This one is a blue bandana print with white arrows on grey fabric as a contrast.

This one has a western theme with cowboys contrasting with a southwestern blanket print.

This one is a bold floral print with hot pink polka-dots to contrast.

This one is a lavender, lime, and turquoise floral with a lavender and white floral contrast

Each is unique and cheerful and looks like the children for whom they were created to enjoy!

They stacked nicely and made me sort of wish I had some here for the children to enjoy when they visit!


They seemed to be a hit as each sat on one another's and wallowed all around the den!
Well, this was the Christmas of the bean bags!
I took my handy-dandy coupon off to Hobby Lobby and purchased fabrics that made me think of each of our grands. I checked with this post and decided that I needed to purchase at least 3/4 of a yard of two complementary fabrics. This was the second hardest part of the whole entire process! I would land on a fabric that I thought was suitable for one of the little mite's personality and then struggled to find another complementary fabric. Finally, I settled on a couple for each child and spent only about $120 total on my fabric.
I did this in stages so as not to get burned out and frustrated. It also helped me to do a little bit at a time in the afternoons when I got home from work so that I didn't make mistakes from fatigue. Thankfully, I have a sewing room in the basement and could leave everything laying out and ready for the next day.
I started by cutting two squares that were at least half the width of the fabric. So, they were around 23" square. I also cut three strips that were 12" by 23" and then one strip that was 13" by 23". The squares would form the top and bottom of the cube and the strips would form the sides. I sent one of the squares home with my daughter, Bridgette, with instructions for monogramming each one.
In the meantime, I began sewing them together. With right sides together, I sewed the three 12"x23" strips to three sides of the square. For some of the fabrics, I had to be careful that the pattern was facing the same direction - like the truck fabric, for example.
Next, I cut the 13"x23" strip in half so that I had two 6 1/2" x 23" strips. With right sides together, I made a mark 4 1/2" from each end and stitched the two pieces back together using a 1/2" seam.

Then, between the marks, I stitched the pieces together using the longest stitch possible on my sewing machine for a basting stitch. This gave me a strip 12"x23" to form the other side for my cubes.

Next, I pressed this seam open. Using a needle and thread, I whip-stitched the end of the zipper together at the top. Then, I unzipped it a couple or three inches and laid it face down on the wrong side of strip just on top of my basted seam area, pinning it in place between my marks.

I pinned the zipper in place at a couple more spots along its length. Then, I went to the sewing machine. Starting at the top right of the zipper, I began to stitch it to my fabric strip, centering the teeth of the zipper along the seam line.

I tried to keep the edge of my zipper foot even with the edge of the zipper to keep my stitching straight. Having the zipper unzipped a bit allowed me to wiggle the zipper pull and helped to keep my stitching straight and close to the teeth of the zipper.

When I got just past the teeth of the zipper at the opposite end, I paused my sewing machine, making certain that my needle was down through the zipper and the fabric.

Then, I lifted my presser-foot and pivoted my fabric and zipper 90 degrees and lowered my presser-foot again. Then, I stitched and did a back-up stitch across the end.

Then, again leaving the needle down, I pivoted once again and stitched up the other side of the zipper.

When I got to the top end of the zipper again, I pivoted one more time and stitched and did another back-up stitch to secure the top end as well.

Using a seam ripper, I picked out a few stitches to expose the zipper. Then, I took the loose thread piece and pulled it out to reveal the entire zipper.

This was the first time I ever recall installing a zipper in all my years of sewing! I think they turned out wonderfully!

After installing the zipper, I stitched this strip to the final side of the square. I did this assembly-line style and they all wound up looking like the photo below.

This is one of the ones where I had to make certain that the pattern was all facing the same direction. In this case, I wanted all of the vehicles to have the tires toward the bottom piece as shown in the photo above.

At that point, I also decided I wanted to attach a handle to make it simpler for the grands to carry from place to place. So, I cut a strip of fabric about 4" x 10". I turned it with right sides together and stitched a 1/4" to 1/2" seam along the long side of the strip to form a tube. Then, I turned the tube right side out and pressed the seam to the back side. I turned under a half-inch on both ends of the tube. I top-stitched all around the edge of this strip keeping my stitching about 1/8" from the edge. Then, I centered the strip onto the side next to the zipper and stitched a rectangle on either end of the handle to hold it securely in place. You can see the handle on the side nearest the bottom in the photo above. I made it out of the contrast fabric for this cube because that fabric seemed a bit sturdier. For the others, I made the handle out of the same fabric as the sides so that it would blend in and not be noticable.

Next, I stitched the sides together one-by-one. I lined up each side with right sides together. and stitched from the raw, loose edge down to where the sides joined the bottom. Using the photo above, that would be stitching from left to right.

I folded the corner of the bottom side down as shown to make it come to a point. Then, I just stitched right up to the edge on both sides using a quarter-inch seam allowance. This made the three pieces of fabric join together to form a nice corner as shown in the photo below.

I did this with each of the sides to form a large bucket-type piece. The photo below shows one of the cubes at this stage. It is turned right-side-out and the sides are collapsed toward the center.

When my daughter had finished monogramming the tops, she sent them via special delivery by her hubby, Corey. So, my next step was to turn each 'bucket' wrong side out and unzip the zipper about half-way.

I pinned the monogrammed top onto the open sides, right sides together, matching up the corners and stitched the top to the sides.

Then, I pulled the entire thing through the opened part of the zipper to turn it right side out.

I used a little dowel to sharpen up and push out the corners.

I figured that the cubes would be about 4 cubic feet. Knowing that I wanted just a little bit of play in them to allow them to be more squshy for the grands to lounge on, I ordered bags of polystyrene beads that held 3.5 cubic feet.
Then, came the hardest part of all. I tried doing this by myself. I do not recommend that! It was disastrous! My back porch looked like it had been snowing before I figured out a decent method. Yes, there was cursing involved. Yes, there were tears. Then, I figured out a method and got a couple of them filled. However, my method was not fool-proof. So, I set it aside and waited for some help. Here is how my sweet hubby and I finally got them filled without further swearing or tears:
The beads come in a large cardboard box. Leave the bags in that box. Slice about a six-inch opening in the bag and place a rolled up piece of cardboard tightly into that slid to make a make-shift funnel.

Carefully fit the zipper around the cardboard make-shift funnel. One person should hold the opening up tight around the cardboard funnel while the other carefully lifts the box/bag of beads up to begin pouring into the cube.

Be careful with this because the plastic bag might split further and little polystyrene beads might go flying all over the place. Not that I would know this from experience or anything!
When the bag/box is about half-emptied into the cube, stop and take the bag of the remaining beads out of its box. Snip the entire end off of the bag to provide a clean opening. Stuff the open end of the bag down into the zipper opening of the cube. While one person holds the zipper opening of the cube, the other can tun the bag up and shake the remaining beads down into the cube. Work carefully as a team. Know that static electricity is going to be working against you and be patient. I wound up easing beads down toward the cube and wadding up the bottom of the bag to push them all down into the cube much like one would with a piping bag of icing when icing a cupcake. Then, gently ease the open end of the bag out of the cube and quickly zip the opening before a breeze catches the beads and blows them all over the back porch and yard. Not that I would know this from experience or anything!
They turned out to be really cute and the only hard part at all is stuffing them with the beads. However, having a partner to help with this process made it go 1000% faster and easier! I thought I would make them where the cover could be removed for washing but my advice is that once those beads get in the cushion, never, ever, never open it! In the future, I think I would stitch up a muslin cover to house the beads and make the cute fabric cover to go over the top of it.
This one features a cute lattice print of green, white and grey contrasted with a vehicle print.

Harris's
This one is a blue bandana print with white arrows on grey fabric as a contrast.

Levi's
This one has a western theme with cowboys contrasting with a southwestern blanket print.

Lillie's
This one is a bold floral print with hot pink polka-dots to contrast.

Lydia's
This one is a lavender, lime, and turquoise floral with a lavender and white floral contrast

Luci's
Each is unique and cheerful and looks like the children for whom they were created to enjoy!

They stacked nicely and made me sort of wish I had some here for the children to enjoy when they visit!


They seemed to be a hit as each sat on one another's and wallowed all around the den!
Subscribe to:
Posts (Atom)