I've had the morning smiles here lately.
Well, that is, after I get up and get going and work out the old-age, out-of-shape soreness.
What has been making me smile in the mornings when I'm not really a morning person? Breakfast!
Well, yes. Maybe part of that morning smile is because I get to lie abed till later and eat a leisurely breakfast long after the sun comes up because I'm on my summer break, ya'll!
Those late breakfast dates have allowed me to munch on cereal and fruit at a slow pace while sitting out on the back porch. I have stirred up some beautiful blueberries and yogurt and sometimes even added home-made granola. Some days I enjoy a nice omelet and the company of my husband. Some special days I even have the privilege of being served a breakfast cooked by my hubby!
A special treat was provided a few months ago by Mike's friend, Big Willie D. He gifted us with some breakfast muffins he had stirred up and baked himself. I was delighted. I was inspired!
So, I decided to take Big Willie D's verbal recollection of the recipe and tweak it to make it my own. Because it was my nature to put things off, I just now got around to posting the recipe, though. I highly recommend these muffins to nudge your morning into smiles as well! Just hop over to my recipe blog for more information and create your own yummy-ness and smiles.
If you change the way you look at things, the things you look at change.
Showing posts with label friend. Show all posts
Sunday, July 2, 2017
Friday, March 4, 2016
Uplifting and Blessings
My Daddy was discharged from his hospital stay of several days earlier this week. Mom brought him home and contracted with hospice to support them. We have moments of merriment and moments when we fight tears. Mostly, we have time to cherish and count our blessings.
The visits from the hospice nurses have already proven to us that some people have wings tucked up under their shirts. Those women have been golden thus far. They reassure and coach my mother and give Daddy care and attention as they document his health.
We are learning how to support and make these days comfortable and cope-able.
I can honestly say that I'm not surprised at how my parents friends and neighbors have supported them with visits and delicious meals to make things easier.
I also am grateful to be surrounded with my own friends and family who call just to check in or who send me text and voice messages to uplift our spirits.
A perfect example of such a moment of lifting happened yesterday morning as I was getting ready to leave home for work.
Out of the blue, I got a text message from a friend of mine with whom I kept company as an undergraduate more than thirty years ago. This is a friend whose path and mine have crossed several times over the years and we can just pick up where we left off in a conversation even though it has been months or even years since we last were together. Her father died after an extended illness several years ago. So, when I got her message, I knew that she was thinking of that time and lifting us up. Here is our exchange.
The visits from the hospice nurses have already proven to us that some people have wings tucked up under their shirts. Those women have been golden thus far. They reassure and coach my mother and give Daddy care and attention as they document his health.
We are learning how to support and make these days comfortable and cope-able.
I can honestly say that I'm not surprised at how my parents friends and neighbors have supported them with visits and delicious meals to make things easier.
I also am grateful to be surrounded with my own friends and family who call just to check in or who send me text and voice messages to uplift our spirits.
A perfect example of such a moment of lifting happened yesterday morning as I was getting ready to leave home for work.
Out of the blue, I got a text message from a friend of mine with whom I kept company as an undergraduate more than thirty years ago. This is a friend whose path and mine have crossed several times over the years and we can just pick up where we left off in a conversation even though it has been months or even years since we last were together. Her father died after an extended illness several years ago. So, when I got her message, I knew that she was thinking of that time and lifting us up. Here is our exchange.
Sunday, January 5, 2014
Handy, Dandy, Fancy, Schmancy, Useful
One of these things is not like the others...
I know that is what this seems to be.
Yet, in all actuality, they really are all alike.
You see, they all are descriptors for my Christmas gift from Mike!
It is a beauty!
I have used it to make Wedding Cookies, bread, and sausage balls so far. (Click on the links for the recipes.) It is a work horse. It is easy to clean. I love it!
I know that is what this seems to be.
Yet, in all actuality, they really are all alike.
You see, they all are descriptors for my Christmas gift from Mike!
It is a beauty!
I have used it to make Wedding Cookies, bread, and sausage balls so far. (Click on the links for the recipes.) It is a work horse. It is easy to clean. I love it!
Thursday, September 26, 2013
Works-In-Progress
I recently completed a few baby gift projects. So, I thought I would share some photos of the gifts I crafted for my friend at work and tips of them as work-in-progress.
Rick-Rack Receiving Blankets
I used the tutorial Suzanne created over at Just Another Hangup and adapted it a wee bit. I kept with the same size of a full width of fabric and about a yard and a quarter of fabric torn to be a square and a couple of packages of rick-rack.
I also used her fancy template (a plate) and a rotary cutter to round off the corners. Next, I laid the rick-rack near the edge of the fabric and scooted in about a couple of inches from the cut end of the rick-rack and began to sew.
Then, I just guided the rick-rack and fabric and stitched about a quarter-inch in from the edge of the fabric. If I had chosen jumbo rick-rack, I was careful to sew at least a quarter-inch and for smaller rick-rack I stitched more near the one-eighth inch mark. The rick-rack curves nicely around the curved edges at the corner. Then, when I got to the end of a pack of rick-rack and had to start with a new piece, I sort of let the cut end fall off the edge of the fabric. The photo below shows how I gently pulled it down off the edge and started a new piece to creep onto the edge and begin where that other piece 'fell off.'
It is important to follow the edge of the fabric when stitching this and ignore the rick-rack edge. This technique is one I use with piping to make it sort of disappear into a seam and to prevent having a raw edge or too much bulk. Then, there is just a matter of trimming the long tails of unnecessary rick-rack off to make a neat edge. This leaves a nice 'splice' and when the project is finished, one can hardly tell where one piece ends and the next begins and there is no bulky fold or stiff sealant.
For this project, I sent the pieces of fabric with my daughter, Bridgette of Goody Stuff and she did a bit of embroidery personalizing and returned it to me. Then, I just took the two pieces of fabric and pinned them with right sides together and stitched just inside the row of stitching that held the rick-rack on the fabric leaving a place about five inches unstitched. I used this as the hole for turning the fabrics right side out. Then, I gave the entire edge a good pressing with a hot iron. To finish it off, I simply top-stitched about an eighth-of-an-inch from the fabric edge.
The finished product looks polished and professionally done and was really quite simple. These blankets are great personal gifts for a new baby and give a bit more to swaddle and tuck than most of the receiving blankets available for purchase.
The weight is just perfect, I think. However, if one wished for something a bit more heavy as a coverlet, a quilted fabric could be chosen. I like the use of flannel on one side but I also think they are nice with just two soft coordinating cotton fabrics.
The other receiving blanket I made for my friend was made with two soft cotton fabrics.
After I had torn my fabrics to get them squared up nicely, I used my plate template and rotary cutter and rounded the corners. Then, I decided to put a simple C monogram applique to represent the child's last name. I found a simple child-like font online using my iPad and took a screen-shot.
Then, I traced the outline of the letter onto a piece of freezer paper with a marker and cut the shape out.
Next, I ironed the pattern onto a left-over piece of fabric. (Since I had a couple of projects in mind, I bought a yard and a half of the fabric instead of just a yard and a quarter.) The shiny side of the paper was adhered to the right side of the fabric.
I cut the fabric out in the shape of the letter. I knew that I was going to simply use a bit of no-sew fabric tape to adhere this to the blanket so that it would be soft and supple. However, if I had wanted something to have a bit more body and shape to it, I would have ironed the wrong side of the fabric piece to a piece of iron on fusible web and attached the C applique by pressing the fusible web to the blanket fabric.
I peeled the freezer paper away and, using the fusible hem tape, I ironed the fabric C onto the contrasting fabric side of the blanket. Then, I just used a contrasting thread - orange to coordinate with the rick-rack - and zig-zag-stitched around the edge of the fabric applique.
From there I simply put the two blanket pieces - right sides together - and stitched around the edge leaving about five inches unstitched and open, turned it to where right sides were out, pressed it, and top-stitched the edges.
Burp Cloth
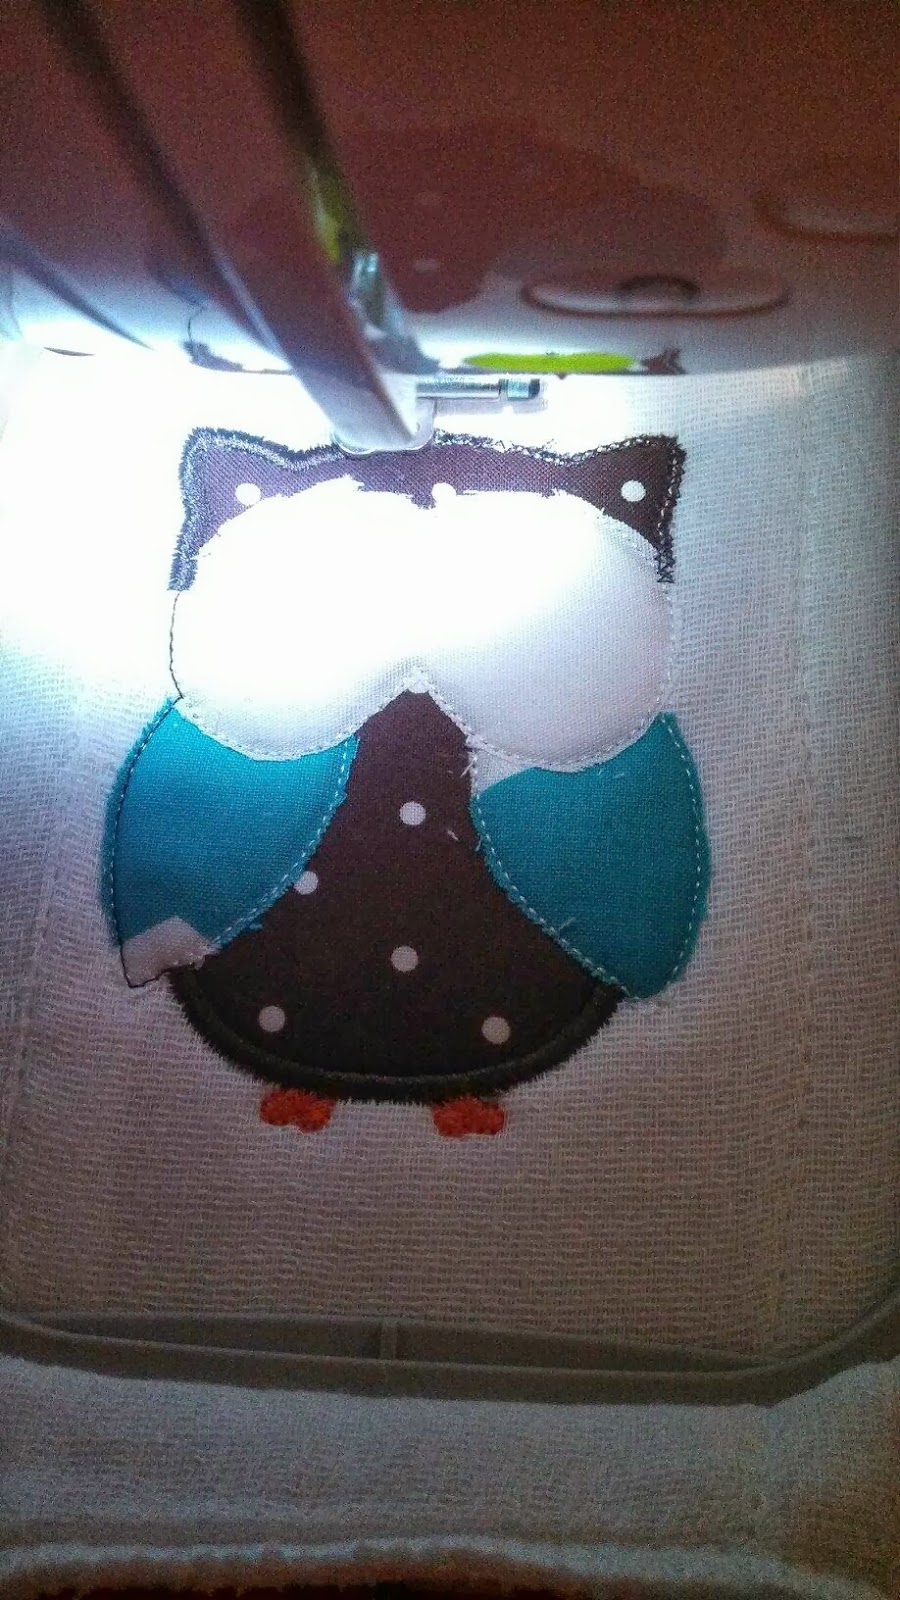
For this project, I have contracted with Bridgette at Goody Stuff and had her applique a cute little owl on one side of the pre-folded diaper. Here is a shot of the work-in-progress:
She has a fancy-schmancy machine to do a multiplicity of cute designs that she programs into it and with a little threading of the needle and a push of a button, the project comes out looking stunning like this:
I measured the center portion of the diaper and cut a strip that width plus a half inch by the length of the diaper plus a half inch. Then, I stitched rick rack to the long edge of the fabric strip just like I had for the blanket. I turned the stitched edge under and pressed it and turned the raw edge of the short edge under a quarter-inch and pressed it. I lined up the pressed strip and pinned it to the center of the opposite side of the diaper from the owl applique. Finally, I top stitched the folded edges at one-eighth-inch from the pressed edge and called it a completed project!
This leaves the burp cloth looking polished and finished on both sides and it is absolutely adorable, I think!
Having new babies join our family - even our extended 'work family' - is exciting and heart-warming. Being able to welcome them into the world with a sweet and simple gift gives us the opportunity to start making memories with them for years to come!
Rick-Rack Receiving Blankets
I used the tutorial Suzanne created over at Just Another Hangup and adapted it a wee bit. I kept with the same size of a full width of fabric and about a yard and a quarter of fabric torn to be a square and a couple of packages of rick-rack.
I also used her fancy template (a plate) and a rotary cutter to round off the corners. Next, I laid the rick-rack near the edge of the fabric and scooted in about a couple of inches from the cut end of the rick-rack and began to sew.
Then, I just guided the rick-rack and fabric and stitched about a quarter-inch in from the edge of the fabric. If I had chosen jumbo rick-rack, I was careful to sew at least a quarter-inch and for smaller rick-rack I stitched more near the one-eighth inch mark. The rick-rack curves nicely around the curved edges at the corner. Then, when I got to the end of a pack of rick-rack and had to start with a new piece, I sort of let the cut end fall off the edge of the fabric. The photo below shows how I gently pulled it down off the edge and started a new piece to creep onto the edge and begin where that other piece 'fell off.'
I lifted the second piece up to show how the first was 'falling off.'
Then, I simply lay the second over top and continued stitching like the photograph below shows.It is important to follow the edge of the fabric when stitching this and ignore the rick-rack edge. This technique is one I use with piping to make it sort of disappear into a seam and to prevent having a raw edge or too much bulk. Then, there is just a matter of trimming the long tails of unnecessary rick-rack off to make a neat edge. This leaves a nice 'splice' and when the project is finished, one can hardly tell where one piece ends and the next begins and there is no bulky fold or stiff sealant.
For this project, I sent the pieces of fabric with my daughter, Bridgette of Goody Stuff and she did a bit of embroidery personalizing and returned it to me. Then, I just took the two pieces of fabric and pinned them with right sides together and stitched just inside the row of stitching that held the rick-rack on the fabric leaving a place about five inches unstitched. I used this as the hole for turning the fabrics right side out. Then, I gave the entire edge a good pressing with a hot iron. To finish it off, I simply top-stitched about an eighth-of-an-inch from the fabric edge.
The finished product looks polished and professionally done and was really quite simple. These blankets are great personal gifts for a new baby and give a bit more to swaddle and tuck than most of the receiving blankets available for purchase.
The weight is just perfect, I think. However, if one wished for something a bit more heavy as a coverlet, a quilted fabric could be chosen. I like the use of flannel on one side but I also think they are nice with just two soft coordinating cotton fabrics.
Here is how this particular receiving blanket looks in the sweet little one's nursery.
The other receiving blanket I made for my friend was made with two soft cotton fabrics.
Dots and Stripes
I went in search of something to coordinate with her owl theme for her little one's nursery and the turquoise and white dresser they had painted to use as sweet clothing storage and a changing table. I discovered the trendy turquoise and white chevron stripe first. Then, I wandered round and found the chocolate brown fabric with multi-colored circles. Since they had chosen not to know whether the baby is a boy or girl, I needed something rather gender neutral. I thought this might be cheerful and fit the requirements. I had thought to use the unique turquoise rick-rack I knew that Hobby Lobby sold. However, it turned out to be a bit more toward a blue instead of leaning toward a greenish turquoise. So, I stuck with my fabrics and found a contrast in a warm color for the edging - orange. This particular rick-rack is a jumbo size and I was a little leery of it but it turned out just fine. After I had torn my fabrics to get them squared up nicely, I used my plate template and rotary cutter and rounded the corners. Then, I decided to put a simple C monogram applique to represent the child's last name. I found a simple child-like font online using my iPad and took a screen-shot.
Then, I traced the outline of the letter onto a piece of freezer paper with a marker and cut the shape out.
Next, I ironed the pattern onto a left-over piece of fabric. (Since I had a couple of projects in mind, I bought a yard and a half of the fabric instead of just a yard and a quarter.) The shiny side of the paper was adhered to the right side of the fabric.
I cut the fabric out in the shape of the letter. I knew that I was going to simply use a bit of no-sew fabric tape to adhere this to the blanket so that it would be soft and supple. However, if I had wanted something to have a bit more body and shape to it, I would have ironed the wrong side of the fabric piece to a piece of iron on fusible web and attached the C applique by pressing the fusible web to the blanket fabric.
I peeled the freezer paper away and, using the fusible hem tape, I ironed the fabric C onto the contrasting fabric side of the blanket. Then, I just used a contrasting thread - orange to coordinate with the rick-rack - and zig-zag-stitched around the edge of the fabric applique.
From there I simply put the two blanket pieces - right sides together - and stitched around the edge leaving about five inches unstitched and open, turned it to where right sides were out, pressed it, and top-stitched the edges.
Burp Cloth
For this project, I have contracted with Bridgette at Goody Stuff and had her applique a cute little owl on one side of the pre-folded diaper. Here is a shot of the work-in-progress:
She has a fancy-schmancy machine to do a multiplicity of cute designs that she programs into it and with a little threading of the needle and a push of a button, the project comes out looking stunning like this:
I measured the center portion of the diaper and cut a strip that width plus a half inch by the length of the diaper plus a half inch. Then, I stitched rick rack to the long edge of the fabric strip just like I had for the blanket. I turned the stitched edge under and pressed it and turned the raw edge of the short edge under a quarter-inch and pressed it. I lined up the pressed strip and pinned it to the center of the opposite side of the diaper from the owl applique. Finally, I top stitched the folded edges at one-eighth-inch from the pressed edge and called it a completed project!
This leaves the burp cloth looking polished and finished on both sides and it is absolutely adorable, I think!
Here is the blanket, burp cloth, and my version of Just Another Hangup's
Maggie the Taggie in my friend's nursery.
Having new babies join our family - even our extended 'work family' - is exciting and heart-warming. Being able to welcome them into the world with a sweet and simple gift gives us the opportunity to start making memories with them for years to come!
Sunday, September 22, 2013
Was there something in the water?
I have heard the old folks talk abut something being in the water when a rash of something seems to break out. I'm wondering if that was the case about nine months ago...
We are awaiting the birth of our first grandson. Our nephew and his wife are expecting a little girl at about the same time. Plus, in my work 'family,' my colleague is expecting a little one as well!
This couple decided that they didn't want to know the gender of their baby and prefer to be completely surprised. I love that extra anticipation, don't you?
As you know, I have sewn a few receiving blankets for the grandson and a couple for the new grand-niece. I've been working on a couple of projects for their little one as well.
We are awaiting the birth of our first grandson. Our nephew and his wife are expecting a little girl at about the same time. Plus, in my work 'family,' my colleague is expecting a little one as well!
This couple decided that they didn't want to know the gender of their baby and prefer to be completely surprised. I love that extra anticipation, don't you?
As you know, I have sewn a few receiving blankets for the grandson and a couple for the new grand-niece. I've been working on a couple of projects for their little one as well.
I fell in love with this soft flannel grey and white zebra stripe fabric. It went together well with this all-over print of elephants, lions, tigers, giraffes. It also has a little bit of pink and a little bit of blue and some green in the print. So, it will work well no matter if the babe is a boy or girl. Just looking at the fabrics made me want to cuddle and swaddle a baby.
I cut the fabric into the size I needed using the Receiving Blanket Tutorial by Suzanne of Just Another Hangup, stitched my rick-rack round the edges and sent it home with my daughter, Bridgette. She worked her magic with her fancy, schmancy embroidery machine and returned it to me. Then, I stitched it together and voila!
Here is a sweet receiving blanket, personalized with the family's last name. I just love the pop of color of that lime green on the soft grey zebra stripe and the sweet zig-zag of the rick-rack edge between the two fabrics!
After the couple had painted and decorated their nursery, I asked to see photos. They painted a dresser out with white and turquoise and are using it as a changing table. She made some cute curtains tied up with ribbons which feature an owl print. They have a wall hanging that features an owl as well. So, I was inspired to revisit one of my favorite blogs, Just Another Hang Up and adapt a couple of Suzanne's ideas. She crafted an owl-shaped blanket with taggy ribbons and called it Maggie the Taggie. She also used the same idea to make a pillow.
So, off I trekked to Hobby Lobby in search of something with an owl. There were a couple of fabric prints but neither featured the softness I was hoping to find for a receiving blanket. I decided to go with a current trend and the couple's featured nursery color. Here are the supplies I selected:
The first find was the soft turquoise chevron print. Then, I found the brown print with multi-colored circles in bright, cheerful colors. I had hoped to use the turquoise rick-rack HL has but it turned out to be a bit too blue for my fabrics. So, I had to choose between using the unique rick-rack or sticking with the eye-popping trendy fabric. I chose trendy. Then, I had to choose a color rick-rack. I knew I wanted something in a warmer color. There was only one spool of red. The yellow was too neon-y. The other blanket had lime green. So, orange became my color of choice.
I decided to make this blanket even more unique and personalize it as well. Being the good southern woman I am, it seems only natural to add a monogram. So, this one got a cute shaped C.
Nothing fancy-schmancy this time. Just a simple letter appliqued using the contrasting fabric that is on the opposite side. I did use orange to stitch on the multi-colored fabric as a way of tying the orange rick-rack in more. I love the look!
I also gathered a few supplies for another little project...
I noticed a soft piece of orange and white chevron fabric in the remnant bin. I also stumbled across some cute reversible orange and turquoise polka-dot ribbon. So, I asked the lady to cut me a half-yard of chocolate brown flannel, gathered another couple of colors and prints of ribbon and headed to the check-out counter.
I used a scrap piece of fabric left from crafting the receiving blanket. I did a little surfing and found an owl pattern over at Sew much time, Sew little fabric. I decided that I liked the shape of the eyes on another applique I had seen. So, I did a little pattern adjusting.
I had to enlarge the pattern a little bit. I simply took my sewing ruler and added 3/4 inch to the outside edge. I had to redraw the ears just a little bit as well. I guess I could have manipulated the original patter with a copier or my printer, but I have always enjoyed drawing my own patterns and this seemed to be just that.
I made good use of the reversible ribbon by making tags featuring both sides. I also included a little bit more chevron by using a yellow and white chevron ribbon for tags on the wings. The orange and white polka-dot ribbon became a beak for the owl and some taggy legs. My left-over fabric became accents on the head. The orange and white chevron became wings. All of these companion fabrics and ribbons were added to the owl-shaped brown flannel front. The back is simply brown flannel with no other accents. I stuffed it with some soft polyester stuffing.
This terrible shot made with my cell phone is the only one I have of the taggy friend by itself.
These two pieces turned out looking so cute together, I think! I did work to get one more piece to fit with them, though...well, it was a wee bit of work for me, anyway.
I gave my daughter, Bridgette a call. She has just started up a cottage business called Goody Stuff. I asked her to embroider or applique a little owl on a burp cloth for this to become a set and sent her a text photo of my completed pieces. Shortly afterward, I got a message letting me know that the last piece of the set was a work-in-progress.
How cool is that?
She selected an applique design that was similar and chose fabrics from her scraps which were similar in color and design and set her machine to work! Here is how he looked completed:
I love his sleepy little eyes.
She delivered this to me and I added a piece of left-over fabric and some rick-rack to the back side to finish it off.
This is one gift set that I was really pleased to pass along to the recipients. I thought it was going to look pretty well with the photos she had shown me of their nursery.
I think it looks pretty cute all piled together!
So, if there was something in the water a while back, I think we got them all covered with sweet little receiving blankets. I'll share some in-progress pictures soon.
Saturday, June 29, 2013
Busy Week, ahem... Actively Engaged Days
What a week! Sunday was a day for sharing.
I sharedwhat little I know, ahem... my vast knowledge about canning and freezing with my daughter-in-law and her friend Kali. (I really have a hard time figuring out what this poor girl's name is because Mike, Stephen, and even her husband, Mark, tease her by calling her Kallie and Kathy and who-knows-what-else. And when you are sitting and chatting with one another, you rarely call somebody by her name...So, when I got ready to introduce her the other day, my mind just went blank. Sorry, Kathy Kallie Katherine Kimberly Katy, ahem... Kali!)
~sigh~
Anyway, I guided these sweet girls through canning six beautiful jars of green beans that were fresh from Stephen and Bonnie's garden and picked and snapped and washed by her! (What you don't realize is that she has never aspired to be a domestic goddess and has always been an outdoor girl and is now a business maven during her off-outdoor-girl time, which is six-days-per-week, since she and Stephen own their own business. Read about that HERE and HERE.) Her beans turned out to look like blue-ribbon-winners at anybody's state fair, though.
At this point, you may be wondering why I'm not sharing photographs of this momentous occasion. Well, there is a perfectly good explanation and it might have something to do with my sitting at the island tasting a splash of Arrington Vineyards' Firefly Rose (that they brought along) and yack-yack-yacking and never even thinking of taking a photo of these cute, sweet, hard-working girls I'mbossing around, ahem... mentoring through the preservation-of-food lessons.
~sigh~
The girls also sliced and blanched and chilled and bagged five quarts of yellow squash and five quarts of zucchini squash. It turned out to be beautiful as well! Of course, this culinary delight which was 'put-up' for future meals when we are in the dead of winter, for example, was also grown right in these girls' gardens and picked by their own sweet hands (and maybe the rough, calloused hands of their husbands, too).
Do you see me puffed with pride over these girls?
~sigh~
Monday was a day the hubs took a day off from work and we had the chance spend the day together. Wednesday was another day for my friend Margaret and I to do some morework on school-work, ahem... Refreshing and Updating. Friday was a day for a follow-up visit to the doctor for Mike and, of course I went along to find out what the doctor had to say because who knows what it would sound like coming from Mike? Somehow he seems to hear medical instructions a little bit differently than I do. You know, like, "go home and keep your leg propped up," turned into, "I'm going out to the barn to feed and water the chickens and do a little grass mowing."
So, I'm spending this Saturday morningtrying to catch up and wrangle the house back into submission, ahem... leisurely sipping coffee and I might swish over the floors after I nibble a piece of toast.
I shared
~sigh~
Anyway, I guided these sweet girls through canning six beautiful jars of green beans that were fresh from Stephen and Bonnie's garden and picked and snapped and washed by her! (What you don't realize is that she has never aspired to be a domestic goddess and has always been an outdoor girl and is now a business maven during her off-outdoor-girl time, which is six-days-per-week, since she and Stephen own their own business. Read about that HERE and HERE.) Her beans turned out to look like blue-ribbon-winners at anybody's state fair, though.
At this point, you may be wondering why I'm not sharing photographs of this momentous occasion. Well, there is a perfectly good explanation and it might have something to do with my sitting at the island tasting a splash of Arrington Vineyards' Firefly Rose (that they brought along) and yack-yack-yacking and never even thinking of taking a photo of these cute, sweet, hard-working girls I'm
~sigh~
The girls also sliced and blanched and chilled and bagged five quarts of yellow squash and five quarts of zucchini squash. It turned out to be beautiful as well! Of course, this culinary delight which was 'put-up' for future meals when we are in the dead of winter, for example, was also grown right in these girls' gardens and picked by their own sweet hands (and maybe the rough, calloused hands of their husbands, too).
Do you see me puffed with pride over these girls?
~sigh~
Monday was a day the hubs took a day off from work and we had the chance spend the day together. Wednesday was another day for my friend Margaret and I to do some more
So, I'm spending this Saturday morning
Wednesday, June 19, 2013
Refreshing and Updating
What a wonderful day I've had today. I was thrilled to have the opportunity to spend some time with a friend from my college days. I don't mean those days when I was in my early forties and returned to school and I felt like I was trying to wrestle an alligator and get myself into a career where I could support myself, feel fulfilled, and share my passion for literature and writing...I mean those days long, long ago when I was barely more than a girl and thought I had the world by the horns and could lead it around to do my bidding.
My friend, Margaret, and I went through undergraduate school at the same time - often taking the same classes. I got to know her brother, sister, and parents back then and learned that we had similar upbringings. We moved on after college - married, had babies - she had three boys and I a girl and boy. (Her eldest are about the same ages as my two.) Later, we reconnected when her brother married and our children were members of his wedding party. Still later, we stumbled upon one another here or there along the way.
Like one day when Mike and I were out doing some last minute shopping at Target and there were her and her husband. The four of us just parked our buggies and chatted as if we were touching base after being apart for a couple of weeks and as if we were not each on a mission to get something done in a hurried fashion!
About a year ago, another dear friend of mine, Angela, began working at a different school. She mentioned the name Margaret a couple of times in passing conversation. Low and behold, her teaching friend, Margaret, turned out to be MY Margaret! Isn't it a small world?
Now that you have all the background history that is vital to thistrivial drawn-out informative post, I can continue...
Margaret shot me an email last week and invited me to get together with her. One thing led to another and then today I trekked over to her house. Thepremise intention was for us to work on some teacher-y things together.
First, we assembled the ingredients for our lunch...and chatted.
We supervised her family dogs' bathroom break and sipped some water, ourselves...and chatted.
We logged onto our computers...and chatted.
We did a wee bit of teacher-type work...and chatted.
We took a lunch break to enjoy the delicious chicken wraps for which we had concocted condiments and sauces...and chatted.
We enjoyed a leisurely meal...and chatted.
We did a few more teacher-type tasks...and chatted.
It was one of those times when one of us asked the other a question about a family member and that answer led to a story and that story led to a tale and that tale led to an update...
I'd like to think of the day as spent with us refreshing and updating our internal computers. After about six hours, we had mastered about three teacher-y tasks and we were getting close to being caught up on some important family topics...
We plan to get together next week to do a little more teacher-type work...and maybe a wee, tiny, little bit of refreshing and updating!
My friend, Margaret, and I went through undergraduate school at the same time - often taking the same classes. I got to know her brother, sister, and parents back then and learned that we had similar upbringings. We moved on after college - married, had babies - she had three boys and I a girl and boy. (Her eldest are about the same ages as my two.) Later, we reconnected when her brother married and our children were members of his wedding party. Still later, we stumbled upon one another here or there along the way.
Like one day when Mike and I were out doing some last minute shopping at Target and there were her and her husband. The four of us just parked our buggies and chatted as if we were touching base after being apart for a couple of weeks and as if we were not each on a mission to get something done in a hurried fashion!
About a year ago, another dear friend of mine, Angela, began working at a different school. She mentioned the name Margaret a couple of times in passing conversation. Low and behold, her teaching friend, Margaret, turned out to be MY Margaret! Isn't it a small world?
Now that you have all the background history that is vital to this
Margaret shot me an email last week and invited me to get together with her. One thing led to another and then today I trekked over to her house. The
First, we assembled the ingredients for our lunch...and chatted.
We supervised her family dogs' bathroom break and sipped some water, ourselves...and chatted.
We logged onto our computers...and chatted.
We did a wee bit of teacher-type work...and chatted.
We took a lunch break to enjoy the delicious chicken wraps for which we had concocted condiments and sauces...and chatted.
We enjoyed a leisurely meal...and chatted.
We did a few more teacher-type tasks...and chatted.
It was one of those times when one of us asked the other a question about a family member and that answer led to a story and that story led to a tale and that tale led to an update...
I'd like to think of the day as spent with us refreshing and updating our internal computers. After about six hours, we had mastered about three teacher-y tasks and we were getting close to being caught up on some important family topics...
We plan to get together next week to do a little more teacher-type work...and maybe a wee, tiny, little bit of refreshing and updating!
Tuesday, June 4, 2013
Recent Visitor
Lately I have had a frequent visitor. I've noticed him several times just wandering round the back yard and checking things out. One day he brought along a buddy and another day I noticed a lady friend. When the lady friend was here there was lots of strutting and puffing out to impress her. Imagine that!
I looked out the other afternoon and there he was...
... just moseying along and checking things out. He has a similar path each time he visits and just seems to be a bit nosey before wandering on to check out other parts of the world.
I looked out the other afternoon and there he was...
... just moseying along and checking things out. He has a similar path each time he visits and just seems to be a bit nosey before wandering on to check out other parts of the world.
Sunday, November 25, 2012
Artiste
Have you ever been to one of those places where you can visit with your friends, sip a glass of wine, and be guided through creating a painting? Well, I've seen them advertised but never had been until this week. My friend, Kathy, invited me to tag along with some of her friends and I did!
We each took snacks and something to sip. The place is called Uptown Art Uncorked! I soon found that the snacks and sipping would not be possible for me. Every time we worked toward a break for snacks and sipping I was behind and needed that time to catch up!
The experience was great fun. We started with a little sketching onto our canvas. Then, we began mixing paint and transformed it from plain white to a beautiful masterpiece. The teacher walked us through step-by-step and modeled for us what we should do. She was an exceptional guide and mentor.
Interestingly, each person's painting turned out different but every one was really wonderful! I am quite pleased with mine and I think Mike was really blown away with the depth of my artistic talent.
We each took snacks and something to sip. The place is called Uptown Art Uncorked! I soon found that the snacks and sipping would not be possible for me. Every time we worked toward a break for snacks and sipping I was behind and needed that time to catch up!
The experience was great fun. We started with a little sketching onto our canvas. Then, we began mixing paint and transformed it from plain white to a beautiful masterpiece. The teacher walked us through step-by-step and modeled for us what we should do. She was an exceptional guide and mentor.
Interestingly, each person's painting turned out different but every one was really wonderful! I am quite pleased with mine and I think Mike was really blown away with the depth of my artistic talent.
It is highlighted with glitter that doesn't show up here!
Subscribe to:
Posts (Atom)